Next.js Tailwind/Flowbite
Learn how to code a powerful and secure Fullstack project with Next, MongoDB, NextAuth, and Tailwind/Flowbite components library.


A few years ago, if you wanted to build a complete app, you needed to know two different things: how to make the front part (what users see) and the back part (where data is stored and managed). Now, with Next.js, things are easier. Next.js lets you handle both parts in one place. This is great for quickly building and launching new apps.
- 👉 Rocket NextJS - the source code explained in this article
- 👉 Rocket NextJS - LIVE demo (deployed on Vercel Cloud)
In this article, we're going to show you how to create a full app using Next.js, MongoDB, Flowbite, and NextAuth. We'll focus on making sure users can sign up, log in, and log out easily by building a solid backend with NextAuth and Next.js routing. Let's dive into building a registration page, a login page, and a home page with a logout button.
✅ Setting Up the Next.js Environment
Before starting to code, let's setup the development environment. For this purpose, ensure you have the latest version of Node installed on your machine. Then, run the following commands.
npx create-next-app@latest
For this article, we will work on the app directory.
What is your project named? nextjs-auth-app
Would you like to use TypeScript? Yes
Would you like to use ESLint? Yes
Would you like to use Tailwind CSS? Yes
Would you like to use `src/` directory? No
Would you like to use App Router? (recommended) Yes
Would you like to customize the default import alias (@/*)? No
Once it is done, ensure that the project is well configured with the following commands to start the server.
cd nextjs-auth-app
npm run dev
Your application should be running at http://localhost:3000.
Now that the project is created, we can move to other configurations of other libraries such as Flowbite and MongoDB. But before that, let's ensure that we are on the same page when it comes to Next.js AppRouter concept.
✅ Understanding App Router
The App Router operates within the new app directory. This allows for a seamless integration alongside the existing pages directory, enabling developers to either gradually transition to the new system or utilize both routing mechanisms simultaneously, depending on project needs.
Key aspects of the App Router include:
- Nested and Shared Layouts: Facilitating the creation of nested routes and shared layout components, which streamline the UI/UX development process.
- Optimized Data Fetching and Rendering: Using server components for more efficient data management and rendering, significantly enhancing application performance and reducing initial page load times.
- Extended Functionalities: Offering additional features such as built-in SEO optimization, comprehensive error handling with dedicated components, and Route Groups for logically organizing related routes without changing their URL paths.
Here is an example of what a Next.js application can look like with AppRouter.
app/
│
├── api/                        # Contains API routes and server-side logic
│   ├── auth/
│   │   └── [...nextauth].ts    # NextAuth.js configuration and authentication endpoints
│   └── ...                     # Other API routes
│
├── dashboard/                  # Dashboard section of the app
│   ├── [userId]/               # Dynamic route segment for user-specific pages
│   │   ├── settings/
│   │   │   └── page.tsx        # Settings page for a specific user
│   │   └── page.tsx            # Main dashboard page for a specific user
│   ├── layout.tsx              # Shared layout for all pages under dashboard
│   └── ...                     # Other files or folders for dashboard section
│
├── auth/                       # Authentication related pages
│   ├── login/
│   │   └── page.tsx            # Login page
│   ├── register/
│   │   └── page.tsx            # Registration page
│   └── ...                     # Other authentication pages
│
├── layout.tsx                  # Global layout applied to all pages in the app
└── ...                         # Other global files or utilities
For more information, feel free to check the official documentation https://nextjs.org/docs/app.
We can now move to other configurations of other libraries such as Flowbite and MongoDB.
✅ Configuring Flowbite & MongoDB
Before we start adding login features to our app, we need a place to store user information. We're going to set up a database for this, and we'll use MongoDB because it's user-friendly and straightforward to configure.
To use a Mongo database, you will need to have the server installed on your machine or use the free online service https://www.mongodb.com/atlas to create a database and get a URI.
npm install mongoose mongodb bcrypt
Then as it will be needed for authentication, we need to add a MongoDB adapter.
npm install -D @auth/mongodb-adapter
After that, create a directory called utilities in the working directory. In this directory, add a file called dbConnect.ts
// utilities/dbConnect.ts

import mongoose from "mongoose";

async function dbConnect() {
  try {
    await mongoose.connect(process.env.MONGODB_URI! + process.env.DB_NAME);
  } catch (error) {
    throw new Error("Connection failed!");
  }
}

export default dbConnect;
Now that we have added a service for database connection, we can write another service for clientPromise that will be used as an argument for the MongoDB auth adapter.
// utilities/clientPromise.ts

// This approach is taken from https://github.com/vercel/next.js/tree/canary/examples/with-mongodb
import { MongoClient } from "mongodb";

if (!process.env.MONGODB_URI) {
  throw new Error("Please add your Mongo URI to .env.local");
}

const uri: string = process.env.MONGODB_URI;
let client: MongoClient;
let clientPromise: Promise<MongoClient>;

if (process.env.NODE_ENV === "development") {
  // In development mode, use a global variable so that the value
  // is preserved across module reloads caused by HMR (Hot Module Replacement).

  let globalWithMongoClientPromise = global as typeof globalThis & {
    _mongoClientPromise: Promise<MongoClient>;
  };

  if (!globalWithMongoClientPromise._mongoClientPromise) {
    client = new MongoClient(uri);
    globalWithMongoClientPromise._mongoClientPromise = client.connect();
  }
  clientPromise = globalWithMongoClientPromise._mongoClientPromise;
} else {
  // In production mode, it's best to not use a global variable.
  client = new MongoClient(uri);
  clientPromise = client.connect();
}

// Export a module-scoped MongoClient promise. By doing this in a
// separate module, the client can be shared across functions.
export default clientPromise;
✅ Implementing Authentication backend
To add login features to our app using NextAuth.js, we first need to understand how it works with Next.js. NextAuth.js is a tool that makes it easy to add login features to Next.js apps. It sets up a special part of the app (an API route) to handle login requests. You can choose different login methods, like Google, Facebook, or GitHub. NextAuth.js takes care of the login details, like user sessions.
Before we start coding the login part, we need to decide how to store our user information. We'll do this by creating a 'User' model in our database, using MongoDB.
Writing the User model
In the root of the project, create a directory called models. This directory contains files describing database models. Then inside the models directory, create a file called User.ts, which will contain the User model definition.
import mongoose from "mongoose";

const UserSchema = new mongoose.Schema(
  {
    fullName: {
      type: String,
      required: true,
    },
    email: {
      type: String,
      required: true,
      unique: true,
    },
    password: {
      type: String,
      required: true,
    },
  },
  { timestamps: true },
);

export default mongoose.models.User || mongoose.model("User", UserSchema);
The User model contains fields such as fullName, email which is unique, password to save a hashed version of the password and the timestamps. Once the User model is defined, we can easily move to the writing of the authentication logic.
Writing the authentication logic
In our project, we'll make a folder named 'utilities' and inside it, create a file named 'auth.js'.This file will contain the code for the NextAuth instance. For this project in this article, we will go with JWT for authentication. We will also need to define the providers, the pages, the callbacks, and other important configurations and secrets.
import NextAuth from "next-auth";
import type { NextAuthOptions } from "next-auth";
import { MongoDBAdapter } from "@next-auth/mongodb-adapter";
import CredentialsProvider from "next-auth/providers/credentials";
import EmailProvider from "next-auth/providers/email"
import dbConnect from "./dbConnect";
import clientPromise from "./clientPromise";
import bcrypt from "bcryptjs";
import User from "../models/User";

export const authOptions: NextAuthOptions = {
  adapter: MongoDBAdapter(clientPromise),
  session: {
    strategy: "jwt",
  },
  secret: process.env.NEXTAUTH_SECRET!,
  // Configure one or more authentication providers
  providers: [
    // ...add more providers here
    CredentialsProvider({
      name: "Credentials",
      id: "credentials",
      credentials: {
        email: {
          label: "email",
          type: "email",
          placeholder: "email@example.com",
        },
        password: { label: "Password", type: "password" },
      },
      async authorize(credentials, req) {
        await dbConnect();
        // Add logic here to look up the user from the credentials supplied
        if (credentials == null) return null;
        // login

        try {
          const user = await User.findOne({ email: credentials.email });

          if (user) {
            const isMatch = await bcrypt.compare(
              credentials.password,
              user.password,
            );
            if (isMatch) {
              return user;
            } else {
              throw new Error("Email or password is incorrect");
            }
          } else {
            throw new Error("User not found");
          }
        } catch (err: any) {
          throw new Error(err);
        }
      },
    }),

    EmailProvider({
      server: {
        host: process.env.EMAIL_SERVER_HOST,
        port: process.env.EMAIL_SERVER_PORT,
        secureConnection: false,
        requiresAuth: true,
        domains: ["gmail.com", "googlemail.com"],
        auth: {
          user: process.env.EMAIL_SERVER_USER,
          pass: process.env.EMAIL_SERVER_PASSWORD
        },
        tls: { rejectUnauthorized: false }
      },
      from: process.env.EMAIL_FROM,
      maxAge: 2 * 60 * 60, // How long email links are valid for (default 24h)
    }),
  ],
  pages: {
    signIn: "/login",
    newUser: "/dashboard",
  },
  callbacks: {
    // We can pass in additional information from the user document MongoDB returns
    async jwt({ token, user }: any) {
      if (user) {
        token.user = {
          _id: user._id,
          email: user.email,
          name: user.name,
        };
      }
      return token;
    },
    // If we want to access our extra user info from sessions we have to pass it the token here to get them in sync:
    session: async ({ session, token }: any) => {
      if (token) {
        session.user = token.user;
      }
      return session;
    },
  },
};

export default NextAuth(authOptions);
In the code above, we are using the most common provider for authentication CredentialsProvider simply means that the user will send an email and a password. Once we have this data, we have a logic to check if the credentials sent are legit, otherwise, we handle the errors.
The EmailProvider is used to send "magic links" that can be used to sign in.
We are also defining page configurations:
login=> where the user is redirected to loginnewUser=> where new users will be directed here on the first sign-in
You will also notice the usage of a secret process.env.NEXTAUTH_SECRET that should technically be defined in a .env.local file.
# .env.local

NEXTAUTH_SECRET=foo # or a much more longer secretkey
Here is an example of a .env.local that might be useful. Replace the values accordingly.
NODE_ENV=development

NEXTAUTH_URL=http://localhost:3000
NEXTAUTH_SECRET= # Linux: `openssl rand -hex 32` or go to https://generate-secret.now.sh/32

MONGODB_URI=mongodb://0.0.0.0:27017/
DB_NAME=rocketnextjs

EMAIL_SERVER=smtp://user:password@host:port

EMAIL_SERVER_HOST=
EMAIL_SERVER_PORT=
EMAIL_SERVER_USER=
EMAIL_SERVER_PASSWORD=
EMAIL_FROM=
Great! In this section of the article, we have successfully created the backend of the application and everything needed to handle authentication on a Next.js application. We can freely move to building the UI and the routing logic.
Creating Authenticated Pages
In the previous part, we set up JWT for login. Now, we're going to work on creating the web pages and setting up how to move between these pages, using the login setup we just made.
To accelerate the development, we will use Flowbite components to build the UIs.
npm i flowbite-react react-hook-form
Note: We are also installing react-hook-form to handle registration and login forms logic.Once the installation is done, create a directory called components at the root of the project. We will take full advantage of the power of flowbite-react by adding the theming of the Rocket Nextjs project and also build a wrapper for the project. This wrapper will help apply the theme in the application.
First of all, inside the components directory, create a file called flowbite-theme.ts.
import type { CustomFlowbiteTheme } from "flowbite-react";

const flowbiteTheme: CustomFlowbiteTheme = {
  badge: {
    root: {
      color: {
        info: "bg-blue-100 text-blue-800 dark:bg-blue-200 dark:text-blue-800 group-hover:bg-blue-200 dark:group-hover:bg-blue-300",
        primary:
          "bg-blue-100 text-blue-800 dark:bg-blue-200 dark:text-blue-800 group-hover:bg-blue-200 dark:group-hover:bg-blue-300",
      },
      size: {
        xl: "px-3 py-2 text-base rounded-md",
      },
    },
    icon: {
      off: "rounded-full px-2 py-1",
    },
  },
  button: {
    color: {
      gray: "text-gray-900 bg-white border border-gray-200 enabled:hover:bg-gray-100 enabled:hover:text-blue-700 :ring-blue-700 focus:text-blue-700 dark:bg-transparent dark:text-gray-400 dark:border-gray-600 dark:enabled:hover:text-white dark:enabled:hover:bg-gray-700 focus:ring-2",
      info: "text-white bg-blue-700 hover:bg-blue-800 focus:ring-4 focus:ring-blue-300 dark:bg-blue-600 dark:hover:bg-blue-700 dark:focus:ring-blue-800",
      primary:
        "text-white bg-blue-700 hover:bg-blue-800 focus:ring-4 focus:ring-blue-300 dark:bg-blue-600 dark:hover:bg-blue-700 dark:focus:ring-blue-800",
    },
    inner: {
      base: "flex items-center transition-all duration-200",
    },
    outline: {
      color: {
        gray: "border border-gray-200 dark:border-gray-500",
      },
    },
  },
  dropdown: {
    floating: {
      base: "z-10 w-fit rounded-xl divide-y divide-gray-100 shadow",
      content: "rounded-xl text-sm text-gray-700 dark:text-gray-200",
      target: "w-fit dark:text-white",
    },
    content: "",
  },
  modal: {
    content: {
      inner: "relative rounded-lg bg-white shadow dark:bg-gray-800",
    },
    header: {
      base: "flex items-start justify-between rounded-t px-5 pt-5",
    },
  },
  navbar: {
    root: {
      base: "fixed z-30 w-full bg-white border-b border-gray-200 dark:bg-gray-800 dark:border-gray-700",
    },
  },
  sidebar: {
    root: {
      base: "flex fixed top-0 left-0 z-20 flex-col flex-shrink-0 pt-16 h-full duration-75 border-r border-gray-200 lg:flex transition-width dark:border-gray-700",
    },
    item: {
      base: "flex items-center justify-center rounded-lg p-2 text-base font-medium text-gray-900 hover:bg-gray-100 dark:text-white dark:hover:bg-gray-700",
    },
    collapse: {
      button:
        "group flex w-full items-center rounded-lg p-2 text-base font-medium text-gray-900 transition duration-75 hover:bg-gray-100 dark:text-white dark:hover:bg-gray-700",
    },
  },
  textarea: {
    base: "block w-full text-sm p-4 rounded-lg border disabled:cursor-not-allowed disabled:opacity-50",
  },
  textInput: {
    field: {
      input: {
        colors: {
          info: "border-blue-500 bg-blue-50 text-blue-900 placeholder-blue-700 focus:border-blue-500 focus:ring-blue-500 dark:border-blue-400 dark:bg-blue-100 dark:focus:border-blue-500 dark:focus:ring-blue-500",
        },
        withIcon: {
          on: "!pl-12",
        },
      },
    },
  },
  toggleSwitch: {
    toggle: {
      checked: {
        color: {
          blue: "bg-blue-700 border-blue-700",
        },
      },
    },
  },
};

export default flowbiteTheme;
After that, let's write the wrapper component.
"use client"
import type { FC, PropsWithChildren } from "react";
import { Flowbite, useThemeMode } from "flowbite-react";
import { useEffect } from "react";
import theme from "./flowbite-theme";

const FlowbiteWrapper: FC<PropsWithChildren> = function ({ children }) {
  let dark = false;
  if (typeof window !== 'undefined') {
    dark = localStorage.getItem("theme") === "dark";
  }

  return (
    <Flowbite theme={{ dark, theme }}>
      <PersistFlowbiteThemeToLocalStorage />
      { children }
    </Flowbite>
  );
};

const PersistFlowbiteThemeToLocalStorage: FC = function () {
  const [themeMode] = useThemeMode();

  useEffect(() => {
    localStorage.setItem("theme", themeMode);
  }, [themeMode]);

  return <></>;
};

export default FlowbiteWrapper;
With these components ready, we can move to coding the login and registration page. But let's quickly create the Header component.
Creating structure components
Inside the components directory, we will add components for the Header.
// components/Header.tsx

"use client";
import { FC } from "react";
import Image from "next/image";
import { Navbar, Button, Dropdown, Avatar } from "flowbite-react";
import { useSession, signOut } from "next-auth/react";
import Link from "next/link";

const Header: FC<Record<string, never>> = function () {
    const { data: session } = useSession();

    return (
        <header className="sticky top-0 z-20">
            <Navbar fluid>
                <Navbar.Brand href="/">
                    <Image
                        alt="Flowbite logo"
                        height="24"
                        src="/images/logo.png"
                        width="24"
                    />
                    <span className="self-center whitespace-nowrap px-3 text-xl font-semibold dark:text-white">
                        Rocket
                    </span>
                </Navbar.Brand>
                <div className="flex md:order-2">
                    <Navbar.Toggle />
                    {
                        session ?
                            <Dropdown
                                inline
                                label={
                                    <Avatar
                                        alt="User settings"
                                        img="/images/users/roberta-casas.png"
                                        rounded
                                    />
                                }
                            >
                                <Dropdown.Header>
                                    <span className="block text-sm">{session.user?.name}</span>
                                    <span className="block truncate text-sm font-medium">
                                        {session.user?.email}
                                    </span>
                                </Dropdown.Header>
                                <Dropdown.Item href="/dashboard">Dashboard</Dropdown.Item>
                                <Dropdown.Divider />
                                <Dropdown.Item onClick={() => signOut()}>Sign out</Dropdown.Item>
                            </Dropdown>
                            :
                            <>
                                <Link href="/login">
                                    <Button>Login</Button>
                                </Link>
                                <Link href="/register" className="ml-3">
                                    <Button>Sign Up</Button>
                                </Link>
                            </>
                    }
                </div>
                <Navbar.Collapse>
                    <Navbar.Link href="#" active>Home</Navbar.Link>
                    <Navbar.Link href="/#about">About</Navbar.Link>
                    <Navbar.Link href="/#features">Features</Navbar.Link>
                </Navbar.Collapse>
            </Navbar>
        </header>
    );
};

export default Header;
The Header component will make navigation easier in the application as it brings login, signup, and logout buttons and actions to the application.
Let's move to writing api for authentication.
Writing the API logic
In setting up the backend for our application, we first focus on user registration. Inside our app/api directory, we create a subdirectory called auth/register and within it, a file named route.ts.
import User from "@/models/User";
import dbConnect from "@/utilities/dbConnect";
import bcrypt from "bcryptjs";
import { NextRequest, NextResponse } from "next/server";

export const POST = async (request: NextRequest) => {
  const { fullName, email, password } = await request.json();

  await dbConnect();

  const hashedPassword = await bcrypt.hash(password, 5);

  const newUser = new User({
    fullName,
    email,
    password: hashedPassword,
  });

  try {
    await newUser.save();
    return new NextResponse("User has been created", {
      status: 201,
    });
  } catch (err: any) {
    return new NextResponse(err.message, {
      status: 500,
    });
  }
};
This TypeScript file is crucial as it handles the user signup process. It involves importing the User model to manage user data, dbConnect for establishing a database connection, and bcryptjs for securely hashing passwords. The key part of this file is the POST function that processes user details submitted from the signup form.
This function connects to the database, hashes the user's password for security, and attempts to save the new user. On successful creation of a new user, the function sends back a confirmation message. In the event of an error, such as if the email already exists in the database, it returns an appropriate error message.
Inside the api/auth/[...nextauth] directory, create a file called route.ts.
// api/auth/[...nextauth]

import { authOptions } from "@/utilities/auth";
import NextAuth from "next-auth";

const handler = NextAuth(authOptions);
export { handler as GET, handler as POST };
The setup with NextAuth(authOptions) prepares our application to handle authentication, and we ensure that this setup can manage both data retrieval and posting by exporting it as both GET and POST handlers. This allows NextAuth to handle various actions such as verifying if a user is logged in or processing user login requests.
Building the login page
Inside the app directory, create a directory called (auth). This file will contain the code for the login and register pages.
Inside the newly created directory (auth), create a file called Form.tsx. Before building the page, we will write the code for the login form component.
// app/(auth)/login/Form.tsx

"use client";
import { useEffect, useState } from "react";
import { useSearchParams, useRouter } from "next/navigation";
import styles from "./Form.module.css";
import Link from "next/link";
import { signIn, useSession } from "next-auth/react";
import { BsArrowRightCircleFill } from "react-icons/bs";
import { useForm, SubmitHandler } from "react-hook-form";
import Loader from "../loading";

type Inputs = {
  email: string;
  password: string;
};

const Form = () => {
  const params = useSearchParams()!;
  const session = useSession();
  const router = useRouter();

  const {
    register,
    handleSubmit,
    formState: { errors, isSubmitting },
  } = useForm<Inputs>({
    defaultValues: {
      email: "",
      password: "",
    },
  });

  const [error, setError] = useState<string | null>("");

  useEffect(() => {
    setError(params.get("error"));
  }, [params]);

  if (session.status === "authenticated") {
    router?.push("/dashboard");
  }

  const formSubmit: SubmitHandler<Inputs> = (form) => {
    const { email, password } = form;
    signIn("credentials", {
      email,
      password,
    });
  };

  return (
    <form
      onSubmit={handleSubmit(formSubmit)}
      className={`${styles.form_container} flex justify-center items-center flex-col`}
    >
      <h2
        className={`leading-[1.15] mt-12 mx-auto w-full  px-2 text-xl my-6 sm:text-2xl font-semibold  font-Poppins`}
      >
        Log In
      </h2>

      <fieldset className="w-full px-2 flex justify-center items-center flex-col">
        <label
          className="w-full "
          htmlFor="email"
        >
          Email
        </label>
        <input
          type="email"
          {...register("email", {
            required: "Email is required",
            pattern: /[a-z0-9]+@[a-z]+\.[a-z]{2,3}/,
          })}
          className=" w-full   border-solid border-[1px] border-[#EAECEF]"
        />
        {errors.email?.message && (
          <small className="block text-red-600 w-full">
            {errors.email.message}
          </small>
        )}
      </fieldset>
      <fieldset className="w-full px-2 mt-12 flex justify-center items-center flex-col">
        <label
          className="w-full"
          htmlFor="password"
        >
          Password
        </label>
        <input
          type="password"
          {...register("password", {
            required: "Password is required",
          })}
          className=" w-full   border-solid border-[1px] border-[#EAECEF]"
        />
        {errors.password?.message && (
          <small className="block text-red-600 w-full">
            {errors.password.message}
          </small>
        )}
      </fieldset>
      <div className={`flex flex-col justify-center w-full items-center px-2`}>
        <button
          type="submit"
          disabled={isSubmitting}
          className="w-full flex justify-center items-center"
        >
          <span className="text-center flex-1   mt-6 bg-green-700 hover:bg-lightColor hover:font-semibold rounded-md p-[1rem] px-4  text-white cursor-pointer">
            Log in
          </span>
        </button>
        {/* <p
          className={`py-6  text-[#707a8a] text-center ${styles.login_continue}`}
        >
          <span className="mr-1 "> Or</span>
        </p> */}
      </div>
      {/* <div className="flex w-full justify-center px-2 text-lg items-center">
        <GoogleButton />
      </div> */}
      {error && (
        <small className="block w-full px-2 text-red-600">{error}</small>
      )}

      <div className="py-4 px-2 w-full">
        <p>
          <Link
            href="/register"
            className="text-lightColor hover:text-primaryColor hover:underline"
          >
            {" "}
            Create an Account
            <BsArrowRightCircleFill className="ml-2" />
          </Link>
        </p>
      </div>
      {isSubmitting && <Loader />}
    </form>
  );
};

export default Form;
In the code above, we are constructing the user interface for the Login form. The process is straightforward, but let's delve into two specific parts: the formSubmit function and the useEffect hook.
formSubmitMethod: This method is essential for the login process. It captures the entries filled in the login form and then passes these credentials to thesignInmethod ofnext-auth. This integration withnext-authis what enables the authentication process, verifying the user's login details against the stored data in the system.useEffectHook: This hook is used for monitoring and handling errors. It activates each time there's a change in theparamsstate. Theparamsstate is in charge of tracking any errors during the login process. When it detects a change, indicating an error occurrence, theuseEffecthook fetches these error details. It displays them, thereby informing the user about what went wrong during their attempt to log in.
Additionally, you will find this snippet within the component:
// app/(auth)/login/Form.tsx
...
  if (session.status === "authenticated") {
    router?.push("/dashboard");
  }
...
This code ensures that if a user is already logged in, they are redirected away from the login page, typically to a dashboard or another main page of the application. It checks the user's session status and, if authenticated, navigates away from the login page using Next.js router.
And here is the css for the login form component.
/* app/(auth)/login/Form.module.css */

.form_container input,
.form_container label {
    @apply block my-1;
}

.login_continue::before,
.login_continue::after {
    content: '';
    display: inline-block;
    max-width: 170px;
    width: calc(60% - 4em);
    height: 2px;
    background-color: #EAECEF;
    vertical-align: middle;
    @apply mr-1;
}

.form_container input[type="email"],
.form_container input[type="password"] {
    padding: 1em;

}


.form_container>div {
    @apply w-full;
}

.login_continue {
    @apply w-full;
}.form_container input,
.form_container label {
    @apply block my-1;
}

.login_continue::before,
.login_continue::after {
    content: '';
    display: inline-block;
    max-width: 170px;
    width: calc(60% - 4em);
    height: 2px;
    background-color: #EAECEF;
    vertical-align: middle;
    @apply mr-1;
}

.form_container input[type="email"],
.form_container input[type="password"] {
    padding: 1em;

}

.form_container>div {
    @apply w-full;
}

.login_continue {
    @apply w-full;
}
With the login form written, we can create the login page. Inside the app/(auth)/login/ directory, create a file called page.tsx.
import { Metadata } from "next";
import Form from "./Form";

export const metadata: Metadata = {
  title: "Auth | Login",
};

export default function Login() {
  return (
    <main className="max-w-sm pb-12 mx-auto">
      <section>
        <Form />
      </section>
    </main>
  );
}
Let's see how it looks on a browser http://localhost:3000/login.
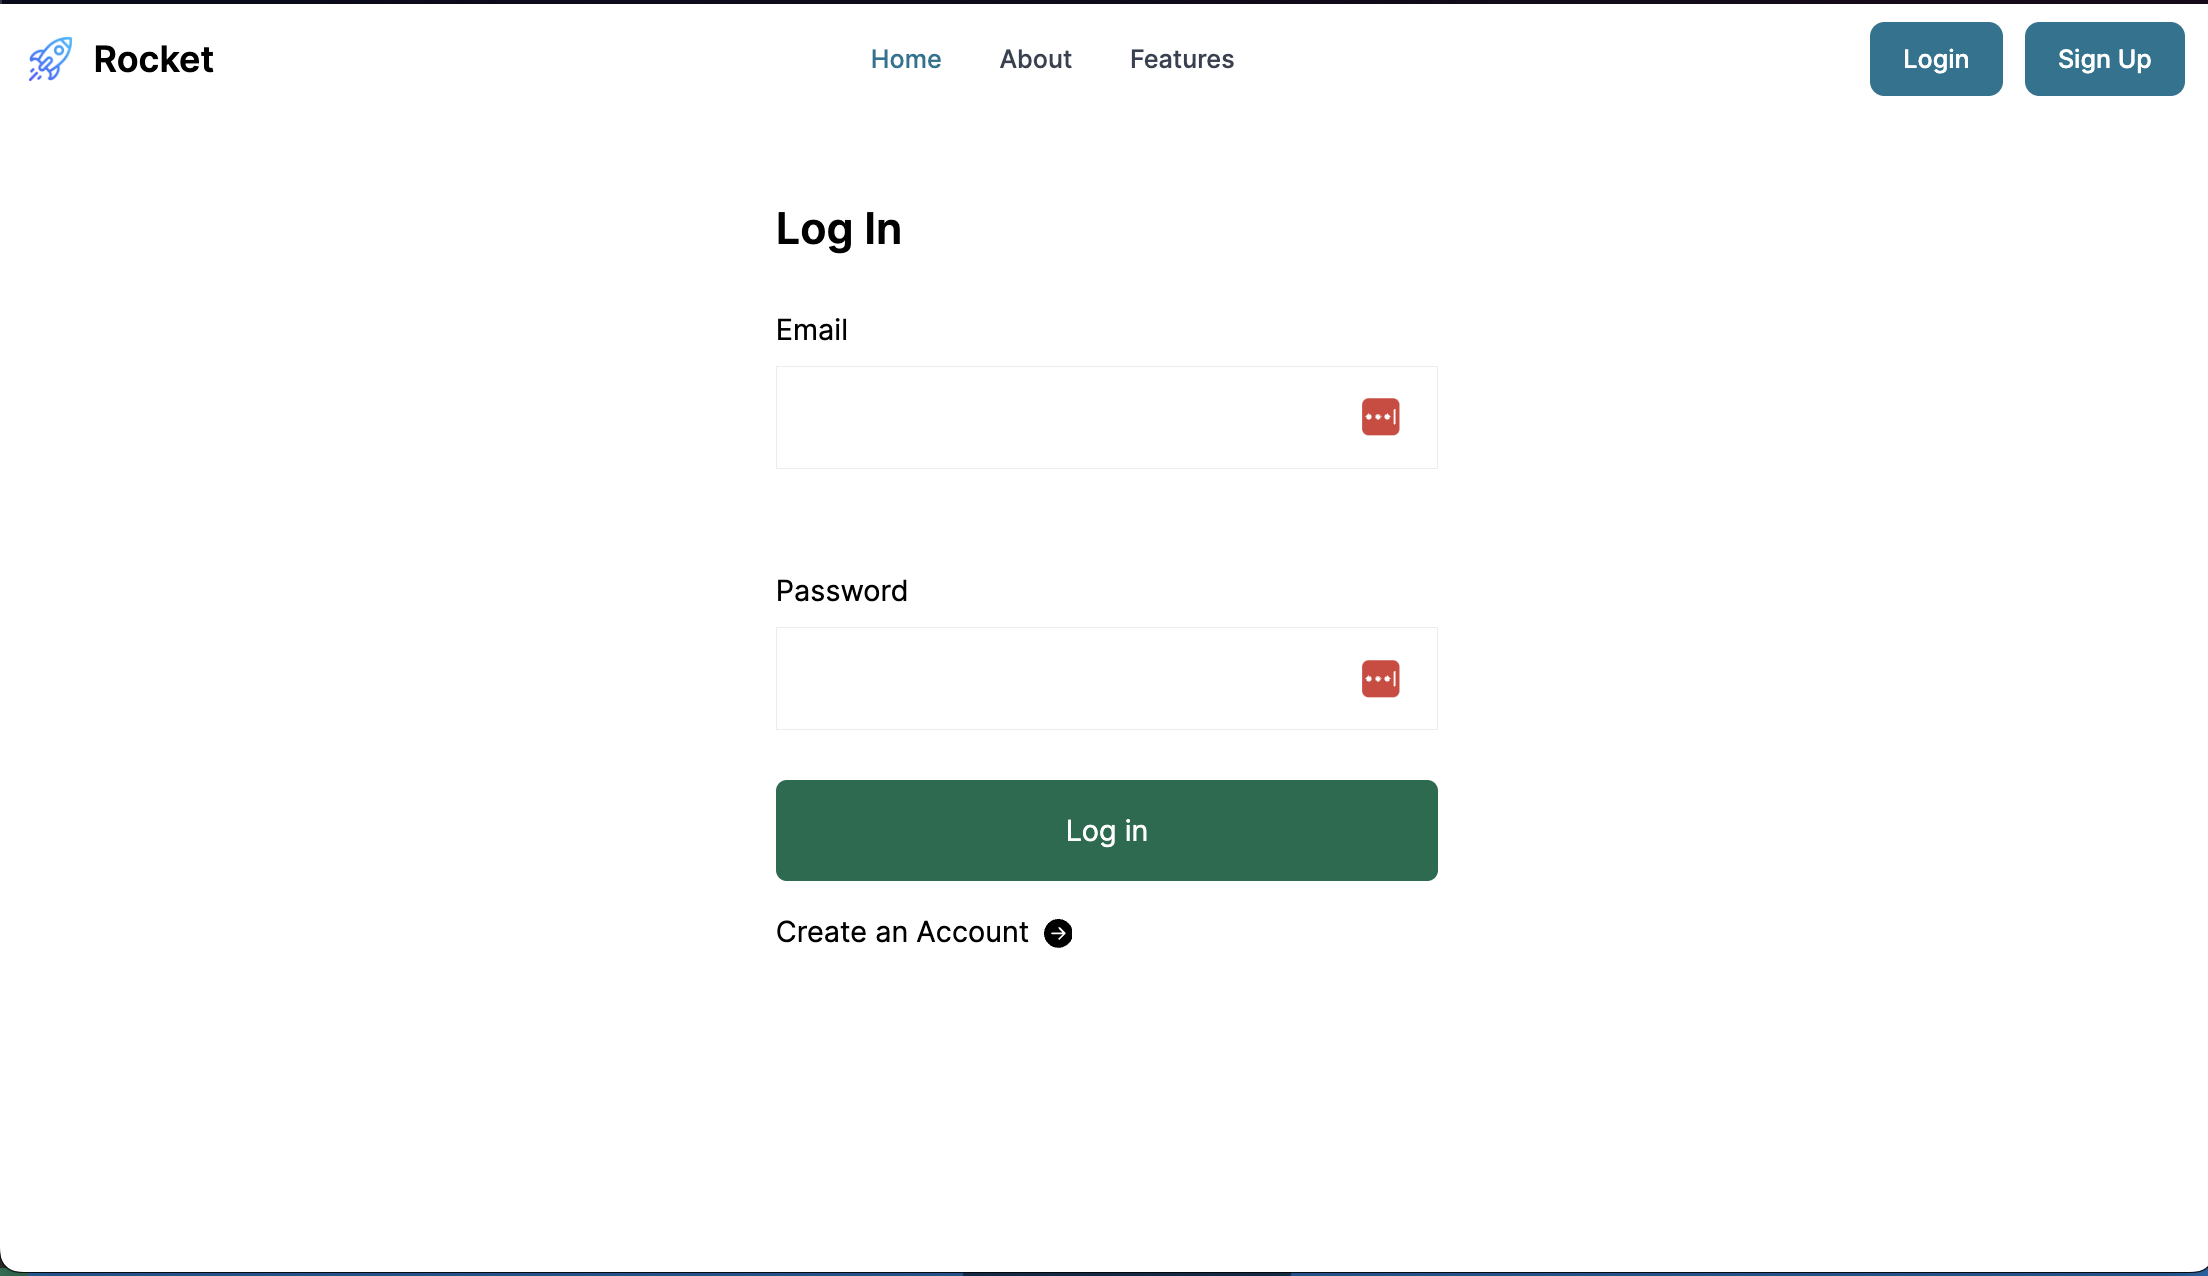
Currently, our application lacks two key components: a user dashboard and a registration page. Let's proceed to build these essential features.
Building the Home page
In the app directory, create a directory called (portal). Inside this directory, create a directory called dashboard. Add a file called MainContent.tsx .
This file will contain the content of the home dashboard.
// app/(portal)/dashboard/MainContent.tsx
"use client";
/* eslint-disable jsx-a11y/anchor-is-valid */
import { Badge, Dropdown, Table, useTheme } from "flowbite-react";
import type { FC } from "react";
const DashboardPage: FC = function () {
return (
<>
<Transactions />
</>
);
};
const Datepicker: FC = function () {
return (
<span className="text-sm text-gray-600">
<Dropdown inline label="Last 7 days">
<Dropdown.Item>
<strong>Sep 16, 2021 - Sep 22, 2021</strong>
</Dropdown.Item>
<Dropdown.Divider />
<Dropdown.Item>Yesterday</Dropdown.Item>
<Dropdown.Item>Today</Dropdown.Item>
<Dropdown.Item>Last 7 days</Dropdown.Item>
<Dropdown.Item>Last 30 days</Dropdown.Item>
<Dropdown.Item>Last 90 days</Dropdown.Item>
<Dropdown.Divider />
<Dropdown.Item>Custom...</Dropdown.Item>
</Dropdown>
</span>
);
};
const Transactions: FC = function () {
return (
<div className="rounded-lg bg-white p-4 shadow dark:bg-gray-800 sm:p-6 xl:p-8">
<div className="mb-4 flex items-center justify-between">
<div>
<h3 className="mb-2 text-xl font-bold text-gray-900 dark:text-white">
Transactions
</h3>
<span className="text-base font-normal text-gray-600 dark:text-gray-400">
This is a list of latest transactions
</span>
</div>
<div className="shrink-0">
<a
href="#"
className="rounded-lg p-2 text-sm font-medium text-primary-700 hover:bg-gray-100 dark:text-primary-500 dark:hover:bg-gray-700"
>
View all
</a>
</div>
</div>
<div className="mt-8 flex flex-col">
<div className="overflow-x-auto rounded-lg">
<div className="inline-block min-w-full align-middle">
<div className="overflow-hidden shadow sm:rounded-lg">
<Table
striped
className="min-w-full divide-y divide-gray-200 dark:divide-gray-600"
>
<Table.Head className="bg-gray-50 dark:bg-gray-700">
<Table.HeadCell>Transaction</Table.HeadCell>
<Table.HeadCell>Date & Time</Table.HeadCell>
<Table.HeadCell>Amount</Table.HeadCell>
<Table.HeadCell>Status</Table.HeadCell>
</Table.Head>
<Table.Body className="bg-white dark:bg-gray-800">
<Table.Row>
<Table.Cell className="whitespace-nowrap p-4 text-sm font-normal text-gray-900 dark:text-white">
Payment from{" "}
<span className="font-semibold">Bonnie Green</span>
</Table.Cell>
<Table.Cell className="whitespace-nowrap p-4 text-sm font-normal text-gray-500 dark:text-gray-400">
Apr 23, 2021
</Table.Cell>
<Table.Cell className="whitespace-nowrap p-4 text-sm font-semibold text-gray-900 dark:text-white">
$2300
</Table.Cell>
<Table.Cell className="flex whitespace-nowrap p-4">
<Badge color="success">Completed</Badge>
</Table.Cell>
</Table.Row>
<Table.Row>
<Table.Cell className="whitespace-nowrap p-4 text-sm font-normal text-gray-900 dark:text-white">
Payment refund to{" "}
<span className="font-semibold">#00910</span>
</Table.Cell>
<Table.Cell className="whitespace-nowrap p-4 text-sm font-normal text-gray-500 dark:text-gray-400">
Apr 23, 2021
</Table.Cell>
<Table.Cell className="whitespace-nowrap p-4 text-sm font-semibold text-gray-900 dark:text-white">
-$670
</Table.Cell>
<Table.Cell className="flex whitespace-nowrap p-4">
<Badge color="success">Completed</Badge>
</Table.Cell>
</Table.Row>
<Table.Row>
<Table.Cell className="whitespace-nowrap p-4 text-sm font-normal text-gray-900 dark:text-white">
Payment failed from{" "}
<span className="font-semibold">#087651</span>
</Table.Cell>
<Table.Cell className="whitespace-nowrap p-4 text-sm font-normal text-gray-500 dark:text-gray-400">
Apr 18, 2021
</Table.Cell>
<Table.Cell className="whitespace-nowrap p-4 text-sm font-semibold text-gray-900 dark:text-white">
$234
</Table.Cell>
<Table.Cell className="flex whitespace-nowrap p-4">
<Badge color="failure">Cancelled</Badge>
</Table.Cell>
</Table.Row>
<Table.Row>
<Table.Cell className="whitespace-nowrap p-4 text-sm font-normal text-gray-900 dark:text-white">
Payment from{" "}
<span className="font-semibold">Lana Byrd</span>
</Table.Cell>
<Table.Cell className="whitespace-nowrap p-4 text-sm font-normal text-gray-500 dark:text-gray-400">
Apr 15, 2021
</Table.Cell>
<Table.Cell className="whitespace-nowrap p-4 text-sm font-semibold text-gray-900 dark:text-white">
$5000
</Table.Cell>
<Table.Cell className="flex whitespace-nowrap p-4">
<span className="mr-2 rounded-md bg-purple-100 py-0.5 px-2.5 text-xs font-medium text-purple-800 dark:bg-purple-200">
In progress
</span>
</Table.Cell>
</Table.Row>
<Table.Row>
<Table.Cell className="whitespace-nowrap p-4 text-sm font-normal text-gray-900 dark:text-white">
Payment from{" "}
<span className="font-semibold">Jese Leos</span>
</Table.Cell>
<Table.Cell className="whitespace-nowrap p-4 text-sm font-normal text-gray-500 dark:text-gray-400">
Apr 15, 2021
</Table.Cell>
<Table.Cell className="whitespace-nowrap p-4 text-sm font-semibold text-gray-900 dark:text-white">
$2300
</Table.Cell>
<Table.Cell className="flex whitespace-nowrap p-4">
<Badge color="success">Completed</Badge>
</Table.Cell>
</Table.Row>
<Table.Row>
<Table.Cell className="whitespace-nowrap p-4 text-sm font-normal text-gray-900 dark:text-white">
Payment from{" "}
<span className="font-semibold">THEMESBERG LLC</span>
</Table.Cell>
<Table.Cell className="whitespace-nowrap p-4 text-sm font-normal text-gray-500 dark:text-gray-400">
Apr 11, 2021
</Table.Cell>
<Table.Cell className="whitespace-nowrap p-4 text-sm font-semibold text-gray-900 dark:text-white">
$560
</Table.Cell>
<Table.Cell className="flex whitespace-nowrap p-4">
<Badge color="success">Completed</Badge>
</Table.Cell>
</Table.Row>
<Table.Row>
<Table.Cell className="whitespace-nowrap p-4 text-sm font-normal text-gray-900 dark:text-white">
Payment from{" "}
<span className="font-semibold">Lana Lysle</span>
</Table.Cell>
<Table.Cell className="whitespace-nowrap p-4 text-sm font-normal text-gray-500 dark:text-gray-400">
Apr 6, 2021
</Table.Cell>
<Table.Cell className="whitespace-nowrap p-4 text-sm font-semibold text-gray-900 dark:text-white">
$1437
</Table.Cell>
<Table.Cell className="flex whitespace-nowrap p-4">
<Badge color="success">Completed</Badge>
</Table.Cell>
</Table.Row>
<Table.Row>
<Table.Cell className="whitespace-nowrap p-4 text-sm font-normal text-gray-900 dark:text-white">
Payment to{" "}
<span className="font-semibold">Joseph Mcfall</span>
</Table.Cell>
<Table.Cell className="whitespace-nowrap p-4 text-sm font-normal text-gray-500 dark:text-gray-400">
Apr 1, 2021
</Table.Cell>
<Table.Cell className="whitespace-nowrap p-4 text-sm font-semibold text-gray-900 dark:text-white">
$980
</Table.Cell>
<Table.Cell className="flex whitespace-nowrap p-4">
<Badge color="success">Completed</Badge>
</Table.Cell>
</Table.Row>
<Table.Row>
<Table.Cell className="whitespace-nowrap p-4 text-sm font-normal text-gray-900 dark:text-white">
Payment from{" "}
<span className="font-semibold">Alphabet LLC</span>
</Table.Cell>
<Table.Cell className="whitespace-nowrap p-4 text-sm font-normal text-gray-500 dark:text-gray-400">
Mar 23, 2021
</Table.Cell>
<Table.Cell className="whitespace-nowrap p-4 text-sm font-semibold text-gray-900 dark:text-white">
$11,436
</Table.Cell>
<Table.Cell className="flex whitespace-nowrap p-4">
<span className="mr-2 rounded-md bg-purple-100 py-0.5 px-2.5 text-xs font-medium text-purple-800 dark:bg-purple-200">
In progress
</span>
</Table.Cell>
</Table.Row>
<Table.Row>
<Table.Cell className="whitespace-nowrap p-4 text-sm font-normal text-gray-900 dark:text-white">
Payment from{" "}
<span className="font-semibold">Bonnie Green</span>
</Table.Cell>
<Table.Cell className="whitespace-nowrap p-4 text-sm font-normal text-gray-500 dark:text-gray-400">
Mar 23, 2021
</Table.Cell>
<Table.Cell className="whitespace-nowrap p-4 text-sm font-semibold text-gray-900 dark:text-white">
$560
</Table.Cell>
<Table.Cell className="flex whitespace-nowrap p-4">
<Badge color="success">Completed</Badge>
</Table.Cell>
</Table.Row>
</Table.Body>
</Table>
</div>
</div>
</div>
</div>
<div className="flex items-center justify-between pt-3 sm:pt-6">
<Datepicker />
<div className="shrink-0">
<a
href="#"
className="inline-flex items-center rounded-lg p-2 text-xs font-medium uppercase text-primary-700 hover:bg-gray-100 dark:text-primary-500 dark:hover:bg-gray-700 sm:text-sm"
>
Transactions Report
<svg
className="ml-1 h-4 w-4 sm:h-5 sm:w-5"
fill="none"
stroke="currentColor"
viewBox="0 0 24 24"
xmlns="http://www.w3.org/2000/svg"
>
<path
strokeLinecap="round"
strokeLinejoin="round"
strokeWidth={2}
d="M9 5l7 7-7 7"
/>
</svg>
</a>
</div>
</div>
</div>
);
};
export default DashboardPage;
Always inside the dashboard directory, create a file called page.tsx and add the following content.
// app/(portal)/dashboard/page.tsx

import { authOptions } from "@/utilities/auth";
import { getServerSession } from "next-auth";
import { redirect } from "next/navigation";

import DashboardPage from "./MainContent";

export default async function Dashboard() {
  const session = await getServerSession(authOptions);
  if (!session) {
    redirect("/login/?callbackUrl=/dashboard");
  }
  return (
    <main className="min-h-screen px-4 pt-6">
      <DashboardPage />
    </main>
  );
}
Inside the page.tsx, we are using the getServerSession to check if there is an ongoing session. If there is no session, we send the user to the login page.
With the dashboard homepage added, we can code the registration page.
Creating the Registration page
In the (auth), create a directory called register. Inside this directory, create a file called Form.tsx. This file will contain the code for the registration form.
// app/(auth)/register/Form.tsx

"use client";

import styles from "./Form.module.css";
import Link from "next/link";
import { useRouter } from "next/navigation";
import { useState } from "react";
import { useForm, SubmitHandler } from "react-hook-form";
import Loader from "../loading";
import { useSession, signIn } from "next-auth/react";
import axios from "axios";
import { toast } from "react-toastify";

type Inputs = {
  email: string;
  fullName: string;
  password: string;
};

const Form = () => {
  const router = useRouter();
  const session = useSession();

  if (session.status === "authenticated") {
    router?.push("/dashboard");
  }

  const {
    register,
    handleSubmit,
    formState: { errors, isSubmitting },
  } = useForm<Inputs>({
    defaultValues: {
      email: "",
      fullName: "",
      password: "",
    },
  });

  const [message, setMessage] = useState<null | string>(null);

  const formSubmit: SubmitHandler<Inputs> = async (form) => {
    const { fullName, email, password } = form;

    await axios.post("/api/auth/register", {
      fullName,
      email,
      password,
    }).then((res:any) => {
      signIn("email", { email })
    }).catch((err:any) => {
      toast(err?.response?.data, { type: 'error' })
    })
  };

  return (
    <form
      onSubmit={handleSubmit(formSubmit)}
      autoComplete="off"
      className={`${styles.form_container} -mt-2 flex justify-center items-center flex-col`}
    >
      <fieldset className="w-full mx-4 flex justify-center items-center flex-col">
        <div className="w-full px-2">
          <label
            htmlFor="lastName"
            className="text-sm"
          >
            First Name
          </label>
          <input
            {...register("fullName", {
              required: "First Name is required",
            })}
            type="text"
            autoComplete="false"
            className="p-3 w-full border-solid border-[1px] border-[#EAECEF]"
          />
          {errors.fullName?.message && (
            <small className="block text-red-600">
              {errors.fullName.message}
            </small>
          )}
        </div>
        <div className="w-full px-2">
          <label
            htmlFor="email"
            className="text-sm"
          >
            Email
          </label>
          <input
            {...register("email", {
              required: "Email is required",
              pattern: /[a-z0-9]+@[a-z]+\.[a-z]{2,3}/,
            })}
            type="email"
            autoComplete="off"
            className="p-3 w-full border-solid border-[1px] border-[#EAECEF]"
          />
          {errors.email?.message && (
            <small className="block text-red-600">{errors.email.message}</small>
          )}
        </div>

        <div className="w-full px-2">
          <label
            htmlFor="password"
            className="text-sm"
          >
            Password
          </label>
          <input
            type="password"
            {...register("password", {
              required: "Password is required",
            })}
            autoComplete="new-password"
            className="p-3 w-full border-solid border-[1px] border-[#EAECEF]"
          />
          {errors.password?.message && (
            <small className="block text-red-600">
              {errors.password.message}
            </small>
          )}
        </div>
      </fieldset>
      <div className="flex flex-col w-full items-center px-2">
        <p className="w-full text-left">
          <Link
            href="/login"
            className="text-lightColor hover:text-primaryColor hover:underline"
          >
            {" "}
            Login with an existing account
          </Link>
        </p>
        {message && <small className="block text-red-600">{message}</small>}
        <button
          type="submit"
          disabled={isSubmitting}
          className="text-center my-12 flex-1 w-full bg-green-700 hover:bg-white hover:text-green-700 hover:border-green-700 hover:border-[1px] hover:font-semibold rounded-md p-[1rem] px-4 mx-2  text-white cursor-pointer"
        >
          Register
        </button>
      </div>
      {isSubmitting && <Loader />}
    </form>
  );
};

export default Form;
In the code we've discussed, when a user fills out the form with their full name, email, and password, and then submits it, the following happens:
- A POST request (a way to send data) is sent to
/api/auth/register. - If everything goes right with the request, the user gets a magic link sent to their email.
This step is important because it checks if the user's account is real (validated) before they can start using the app.
Now that we have our form component ready, the next thing we'll do is create the CSS styles for this component.
/* app/(auth)/register/Form.module.css */

.form_container input,
.form_container label {
    @apply block my-1;
}


.form_container div {
    @apply mt-8;
}

@media(min-width: 640px) {
    .form_container input {
        min-width: 380px;
    }
}
Then create the page.tsx file.
// app/(auth)/register/page.tsx

import { Metadata } from "next";

import Form from "./Form";

export const metadata: Metadata = {
  title: "Auth | Register",
};

const Register = () => {
  return (
    <main className="pb-12">
      <section className="mx-auto max-w-sm">
        <h2
          className={`leading-[1.15] mt-12 text-xl sm:text-2xl font-semibold  px-2 font-Poppins`}
        >
          Create Personal Account
        </h2>
        <Form />
      </section>
    </main>
  );
};

export default Register;
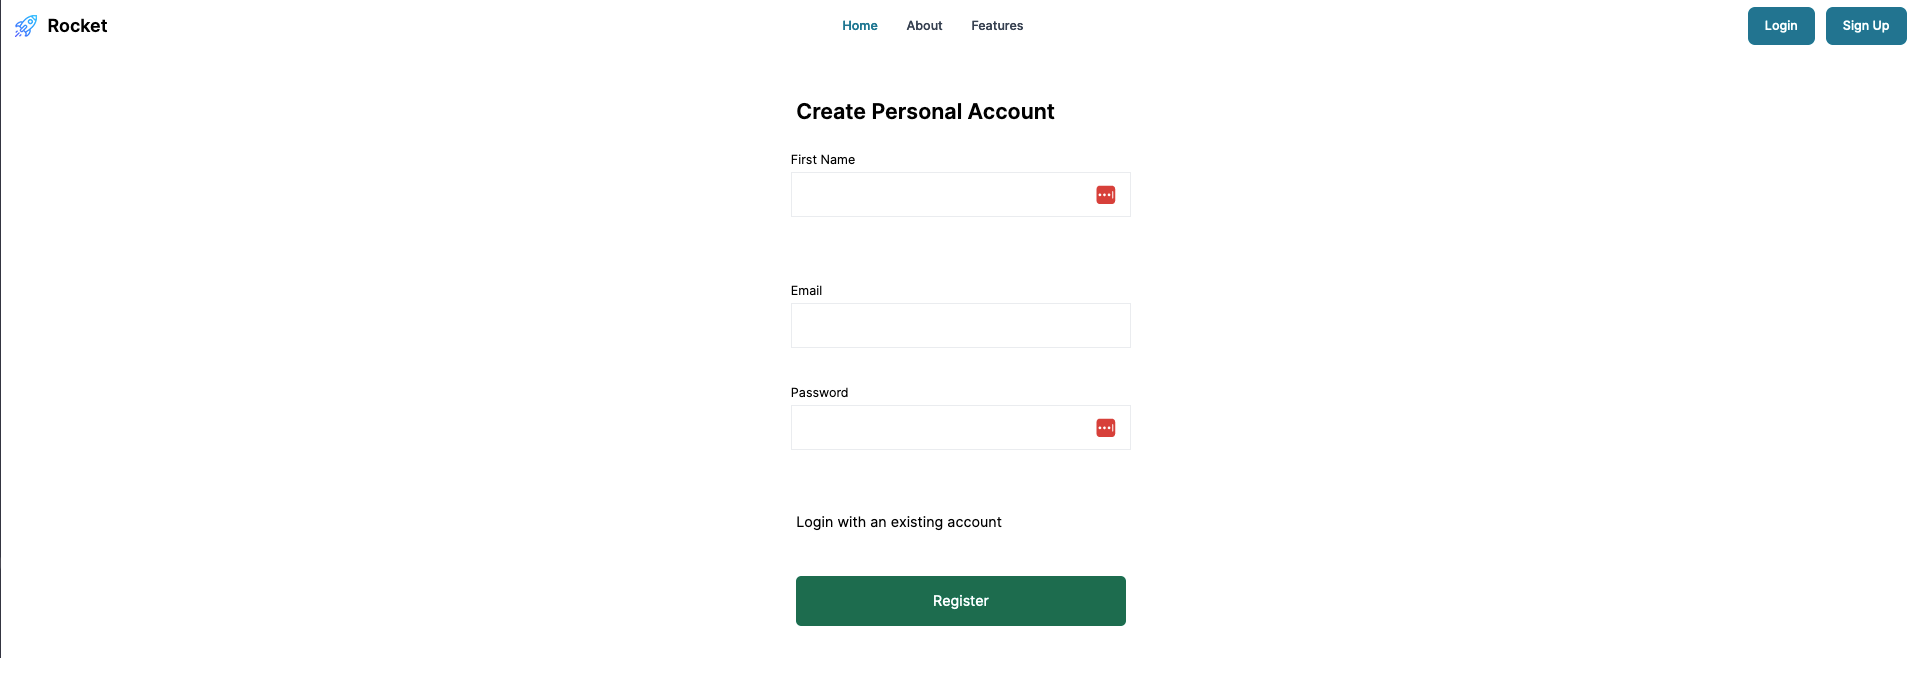
Here is the registration page http://localhost:3000/register.
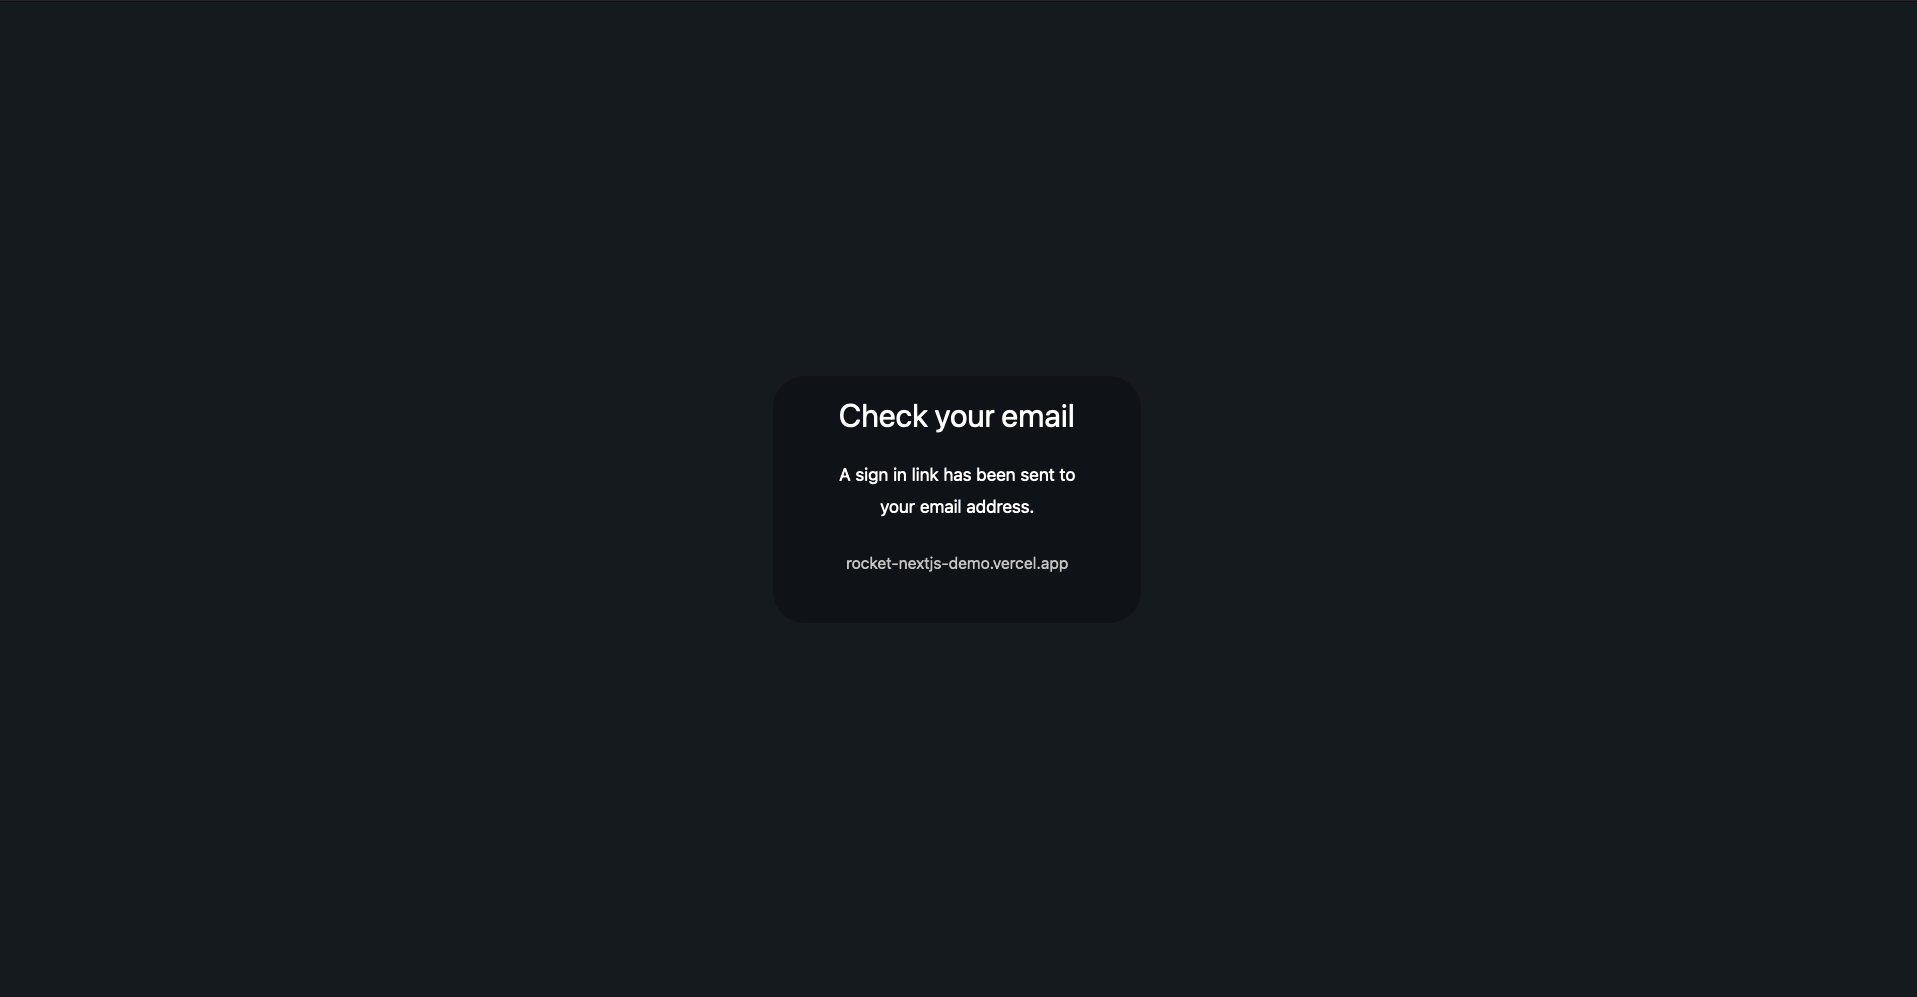
Great! We have successfully built a Next.js full-stack application with a working backend. We have learned how to use and configure NextAuth to handle authentication and session management inside a Next.js application. Here is what happens when a new user registers.
Once the user registers, he will see a similar page.
After clicking on the link sent, he will be redirected to the dashboard home page. And then there is the home dashboard.

You can find a full demo of the application at https://rocket-nextjs-demo.vercel.app. You can find the full code of the application here https://github.com/app-generator/rocket-nextjs.
✅ Conclusion
In this article, we have learned how to build a backend in a Next.js application that handles login, registration, and logout.
After reading this article, you understand how to use the powerful NextAuth package in a Next.js application, thus making your development flow faster than ever. We have also dived into AppRouter the concept in Next.js, as it was used in this article.
✅ Resources
For questions and product requests, feel free to contact AppSeed via email or Discord:
- 👉 Access AppSeed for more starters and support
- 👉 More React/Nextjs Starters actively supported and versioned