Django Charts via DRF and Chart.js (with Samples)
Sample project crafted with Django, Charts.JS, and DRF to showcase how to plot different charts Pie, Line, and Bar Charts.


Hello! Django is a powerful web framework built with Python that you can use to create fully functional web applications or web APIs. This article explains how to code a simple web page that will display data as charts using Django, a simple API powered by DRF and Chart.js for the presentation layer.
Topics Covered:
- 👉 Setup the
Djangoproject - 👉 Writing the
app models - 👉 Load
sample data - 👉 Code the
serializers - 👉 Writing the API via
DRF - 👉 Code the
Javascriptpart - 👉 Update
Configurationand routing
- 👉 Django Charts via DRF - source code
- 👉 More Django apps and dashboards
- 👉 Free support via
emailand Discord.
✨ Setup the project
Before going, make sure that, first of all, let’s set up the project. Feel free to use your favorite python environment management tool. I’ll be using virtualenv here.
$ virtualenv env
$ source env/bin/activateAfter that, we install the libraries we’ll be using for the development and create the project.
$ pip install django
$ pip install djangorestframework
$ pip install djangorestframework-simplejwt
$ pip install django-import-exportCreate the project
$ django-admin startproject coreWe’ll first create an app that will contain all the project-specific features.
$ django-admin startapp appsAfter creating, delete all files and folders except __init__.py, views.py and models.py and apps.py. Then open the settings file containing Django configurations and add core to the INSTALLED_APPS:
   # core/settings.py
    ...
    'django.contrib.messages',
    'django.contrib.staticfiles',

    'apps'
Great! Ensure that the project is well set up by running the following commands:
$ python manage.py makemigrations
$ python manage.py migrate
After that, run the following command to start the server.
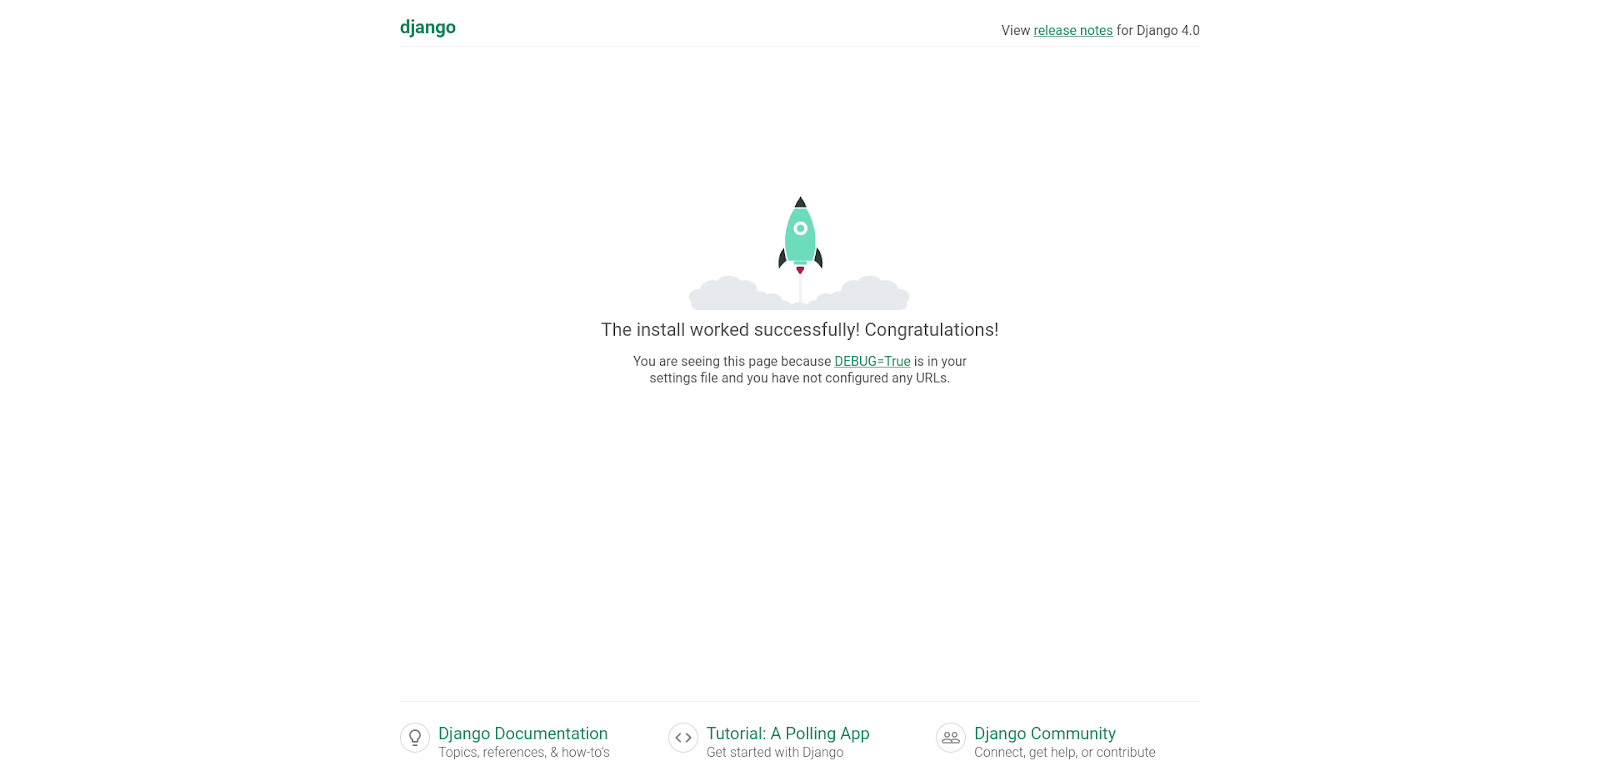
$ python manage runserverIf you access localhost:8000, we should see the Django default splash screen:
✨ Writing the models
This project will contain two models:
- The User model.
- And the Product model.
Following the figure, we notice that the models have the same fields as created and updated. Before creating the application for each feature (user and product), let’s create a base model that will be used by the User model and the Product model.
In the apps/models.py, add the following content.
from django.db import models
from django.utils import timezone

class BaseModel(models.Model):
   created = models.DateTimeField(default=timezone.now)
   updated = models.DateTimeField(auto_now=True)

   class Meta:
       abstract = True
The abstract=True makes sure that no migrations are generated for this model. Let’s move to write the User model.
👉 User model
Before writing the model, we need to create a Django application. In the apps directory, enter the following command.
$ django-admin startapp userOnce it’s done, rewrite the apps/user/apps.py file.
from django.apps import AppConfig

class UserConfig(AppConfig):
   default_auto_field = 'django.db.models.BigAutoField'
   name = 'apps.user'
   label = 'apps_user'
And we can register the application in the settings.py file now.
INSTALLED_APPS = [
   'django.contrib.admin',
   'django.contrib.auth',
   'django.contrib.contenttypes',
   'django.contrib.sessions',
   'django.contrib.messages',
   'django.contrib.staticfiles',

   'apps',                       # <-- OLD
   'apps.user',                  # <-- NEW

   'import_export',
   'rest_framework'
]
Let’s write the User model now based on the BaseModel class.
from django.contrib.auth.models import AbstractUser
from django.db import models

from apps.models import BaseModel

class User(AbstractUser, BaseModel):

   has_purchased = models.BooleanField(default=False)
Django provides a class called AbstractUser that comes with the following fields.
username = models.CharField(
       _("username"),
       max_length=150,
       unique=True,
       help_text=_(
           "Required. 150 characters or fewer."
       ),
       validators=[username_validator],
       error_messages={
           "unique": _("A user with that username already exists."),
       },
   )
   first_name = models.CharField(_("first name"), max_length=150, blank=True)
   last_name = models.CharField(_("last name"), max_length=150, blank=True)
   email = models.EmailField(_("email address"), blank=True)
   is_staff = models.BooleanField(
       _("staff status"),
       default=False,
       help_text=_("Designates whether the user can log into this admin site."),
   )
   is_active = models.BooleanField(
       _("active"),
       default=True,
       help_text=_(
           "Designates whether this user should be treated as active. "
       ),
   )
   date_joined = models.DateTimeField(_("date joined"), default=timezone.now)
It’s very effective for what we want here. We are also adding a new field has_purchased to track a user who has made at least a purchase on the API. Before running the migrations and committing the changes to the database, let’s add in the settings.py a configuration for the AUTH_USER_MODEL that will be used by Django.
...
AUTH_USER_MODEL = "apps_user.User"
...
Now run the following commands:
$ python manage.py makemigrations
$ python manage.py migrate
With the User model added, let’s write a custom admin class to allow data importation with files. django-import-export is a Django application and library for importing and exporting data with included admin integration.
In the apps/user/admin.py, add the following content:
from django.contrib import admin
from import_export import resources
from import_export.admin import ImportMixin

from apps.user.models import User

class UserResource(resources.ModelResource):
   class Meta:
       model = User
       fields = ('id', 'username', 'email', 'has_purchased', 'created', 'updated')

@admin.register(User)
class UserAdmin(ImportMixin, admin.ModelAdmin):
   resource_class = UserResource
   list_display = ('id', 'username', 'email', 'has_purchased', 'created', 'updated')
   list_filter = ('has_purchased',)
   search_fields = ('username', 'email')
A resource defines how objects are mapped to their import and export representations and handle importing and exporting data. In this filed, we declare the UserResource class containing the model and the fields needed when data is imported.
The UserAdmin class also takes the fields displayed, the field used for filtering data, and the fields used for search.
👉 Product Model
Before writing the Product model, let’s create a Django application called product.
$ django-admin startapp product After the application has been created, modify the apps.py file in the product directory.
from django.apps import AppConfig

class ProductConfig(AppConfig):
   default_auto_field = 'django.db.models.BigAutoField'
   name = 'apps.product'
   label = 'apps_product'
And then, let’s register the application in the settings.py file.
INSTALLED_APPS = [
   'django.contrib.admin',
   'django.contrib.auth',
   'django.contrib.contenttypes',
   'django.contrib.sessions',
   'django.contrib.messages',
   'django.contrib.staticfiles',

   'apps',
   'apps.product',               # <--- NEW
   'apps.user',

   'import_export',
   'rest_framework'
]
We can now write the Product model.
from django.db import models

from apps.models import BaseModel

class Product(BaseModel):
   name = models.CharField(max_length=255)
   description = models.TextField()
   price = models.DecimalField(max_digits=10, decimal_places=2)
   quantity_sold = models.IntegerField(default=0)

   def __str__(self):
       return self.name
We will also write a custom admin class for the Product model. In the apps/product/admin.py, add the following content:
from django.contrib import admin
from import_export import resources
from import_export.admin import ImportMixin

from apps.product.models import Product

class ProductResource(resources.ModelResource):
   class Meta:
       model = Product
       fields = ('id', 'name', 'price', 'description', 'created')

@admin.register(Product)
class ProductAdmin(ImportMixin, admin.ModelAdmin):
   resource_class = ProductResource
   list_display = ('id', 'name', 'price', 'description', 'created', 'updated')
   list_filter = ('created',)
   search_fields = ('name',)
Well, with both product admin and user admin written, we can now move to load the sample data in the database using the admin section (import/export feature).
✨ Load Sample Data
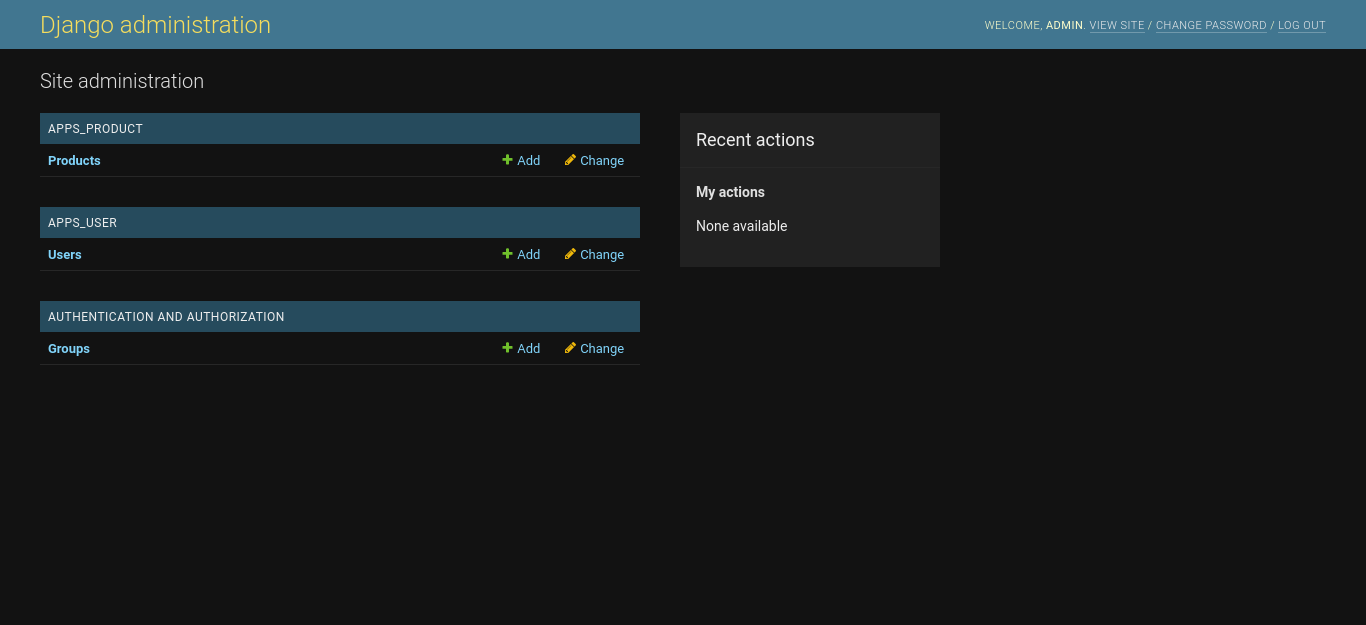
Django provides an admin dashboard that you can use to manage resources (models, users, groups) from our Django project. But before accessing the dashboard, you need admin credentials.
In the shell, enter the following command to create a new superuser.
$ django-admin createsuperuserOnce the superuser is created, we can access the admin section of our project localhost:admin/. After you have successfully logged in, you’ll see a similar page.
Let’s upload data for the users first. Clicking on Add, you’ll be redirected to the following page.
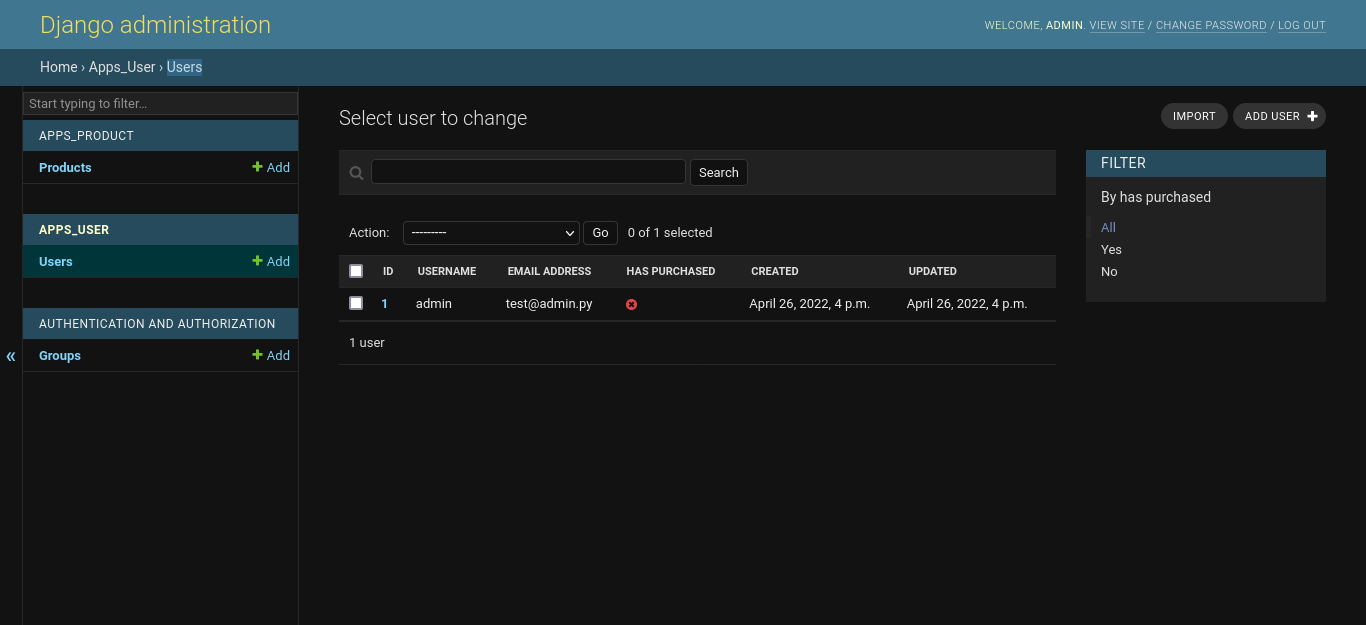
You’ll normally see the first user that is the superuser you’ve just created. Great, now click on import. You’ll have to import a CSV file. You can find an example of this file here.
Once the file is imported, click on Confirm Import.

Your database is now filled with some users' data 🚀. The next step is to load the products data using the same import feature over the Products using the sample data.
✨ Writing serializers
Serializer allows us to convert Django data structures such as query sets or model instances in Python native objects that can be easily converted to JSON/XML format. Let’s start by writing a serializer for the User model.
👉 User serializer
Inside the apps/user, create a file called serializers.py. This file will contain a class called UserSerializer.
from rest_framework import serializers

from apps.user.models import User

class UserSerializer(serializers.ModelSerializer):

   class Meta:
       model = User
       fields = ('id', 'username', 'email', 'has_purchased')
The ModelSerializer helps write serializers based on models very easier. It automatically matches the fields and their types and even adds some automatic validations.
👉 Product serializer
Inside the apps/product/ directory, create a file called serializers.py. This file will contain a model serializer called ProductSerializer.
from rest_framework import serializers

from apps.product.models import Product

class ProductSerializer(serializers.ModelSerializer):
   class Meta:
       model = Product
       fields = ('id', 'name', 'price', 'description', 'created', 'updated')
Great! Now that we have serializers, we can write viewsets.
✨ Writing viewsets
A viewset is a class-based view, able to handle all of the basic HTTP requests: GET, POST, PUT, DELETE without hard coding any of the logic. We are using viewsets here to configure the routing for the API easily.
The /user/ viewset should allow the following structure.

And the product resource will have the following structure.
👉 Writing User viewset
Inside the apps/user/ directory, create a file called viewsets.py. The file will contain a class called UserViewSet.
import calendar

from rest_framework import viewsets
from rest_framework.response import Response
from rest_framework import status
from rest_framework.decorators import action

from apps.user.models import User
from apps.user.serializers import UserSerializer

class UserViewSet(viewsets.ModelViewSet):
   http_method_names = ['get']
   queryset = User.objects.all()
   serializer_class = UserSerializer

   @action(detail=False, methods=['get'], url_path='stats/purchased')
   def purchase_stats(self, request, *args, **kwargs):
       users = User.objects.filter(has_purchased=True)
       return Response({
           'total_users': User.objects.count(),
           'total_purchased': users.count(),
           'purchased_percentage': round(users.count() / User.objects.count() * 100, 2)
       }, status=status.HTTP_200_OK)


   @action(detail=False, methods=['get'], url_path='stats/users_created')
   def user_created_per_month(self, request, *args, **kwargs):
       users = User.objects.all()
       months = []
       for user in users:
           months.append(user.created.date().month)
       months = list(set(months))
       months.sort()
       data = []
       for month in months:
           data.append({
               'month': calendar.month_name[month],
               'count': User.objects.filter(created__month=month).count()
           })
       return Response(data, status=status.HTTP_200_OK)
In this viewset, we are allowing only GET requests. And we are also adding custom actions to the viewset such as purchase_stats and user_created_per_month. These actions compute and return some useful stats.
Let’s do the same for the ProductViewSet.
👉 Writing Products viewset
Inside the apps/product directory, create a file called viewsets.py. This file will contain the ProductViewSet class.
import calendar

from rest_framework import viewsets
from rest_framework.response import Response
from rest_framework import status
from rest_framework.decorators import action

from apps.product.models import Product
from apps.product.serializers import ProductSerializer


class ProductViewSet(viewsets.ModelViewSet):
   http_method_names = ['get']
   queryset = Product.objects.all()
   serializer_class = ProductSerializer

   @action(detail=False, methods=['get'], url_path='sales')
   def sales_over_month(self, request, *args, **kwargs):
       products = Product.objects.all()
       months = []
       for product in products:
           months.append(product.created.date().month)
       months = list(set(months))
       months.sort()
       data = []
       for month in months:
           data.append({
               'month': calendar.month_name[month],
               'count': Product.objects.filter(created__month=month).count()
           })
       return Response(data, status=status.HTTP_200_OK)
Great! With the view sets ready, we can register these view sets to create endpoints and start making requests.
✨ Writing API Endpoints
As we are working with viewsets, we can automatically register the API endpoints using routers.
Inside the apps directory, create a file called routers.py.
from rest_framework import routers

from apps.user.viewsets import UserViewSet
from apps.product.viewsets import ProductViewSet

router = routers.SimpleRouter()

router.register('user', UserViewSet)
router.register('product', ProductViewSet)

urlpatterns = [
   *router.urls,
]
We need then to register this file in the urls.py file of the project. And then these endpoints will be accessible even via the browser.
from django.contrib import admin
from django.urls import path, include

urlpatterns = [
   path('admin/', admin.site.urls),
   path("api/", include(("apps.routers", "api"), namespace="api")),
]
Great! After that, make sure the server is running because we will start making some requests.
✨ Integrating Chart.JS
Chart.js is a JavaScript library that makes working and building charts easier. In this project, we’ll use this library to display line, bar and pie charts.
The data displayed on the charts will come from the REST API we’ve just built and we’ll be using Axios to fetch data from the server.
But first, let’s make some configurations for the Django templating system and the static file such as the JavaScript file that will contain the logic for data fetching and charts configuration.
👉 Configuration
First of all, make sure you have the following configuration for TEMPLATES in the settings.py file.
TEMPLATES = [
   {
       'BACKEND': 'django.template.backends.django.DjangoTemplates',
       'DIRS': [os.path.join(BASE_DIR, 'apps/templates')],
       'APP_DIRS': True,
       'OPTIONS': {
           'context_processors': [
               'django.template.context_processors.debug',
               'django.template.context_processors.request',
               'django.contrib.auth.context_processors.auth',
               'django.contrib.messages.context_processors.messages',
           ],
       },
   },
]
The templates will be created in the apps/template directory. Also, we need the following configuration for static files.
STATIC_URL = 'static/'

STATICFILES_DIRS = [
   os.path.join(BASE_DIR, 'static'),
]
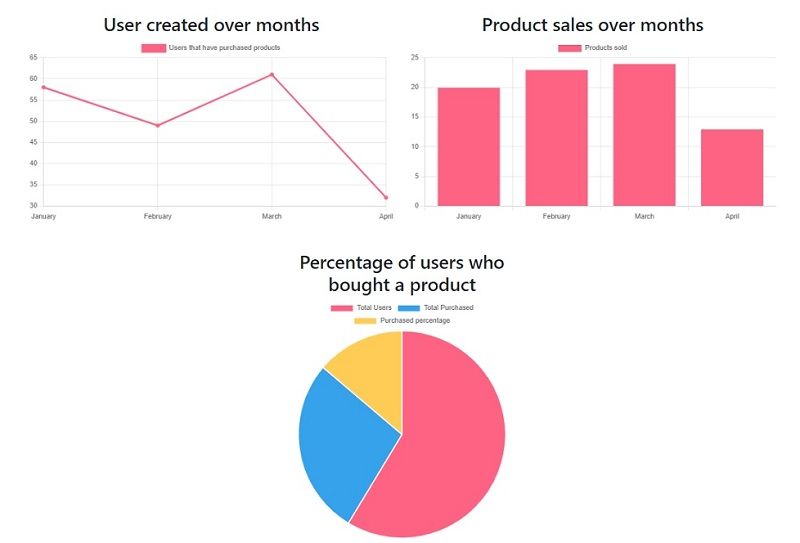
👉 Index.html - Product Homepage
In the apps/templates, create a file called index.html. We’ll just add basic imports for bootstrap, axios and chartjs.
<html lang="en">
<head>
<meta charset="utf-8">
<!-- Chart JS -->
<link href="https://cdn.jsdelivr.net/npm/bootstrap@5.0.2/dist/css/bootstrap.min.css">
<!-- Chart JS -->
<script src="https://cdn.jsdelivr.net/npm/chart.js"></script>
<!-- Axios -->
<script src="https://cdn.jsdelivr.net/npm/axios/dist/axios.min.js"></script>
<title>Stats</title>
</head>
<body>
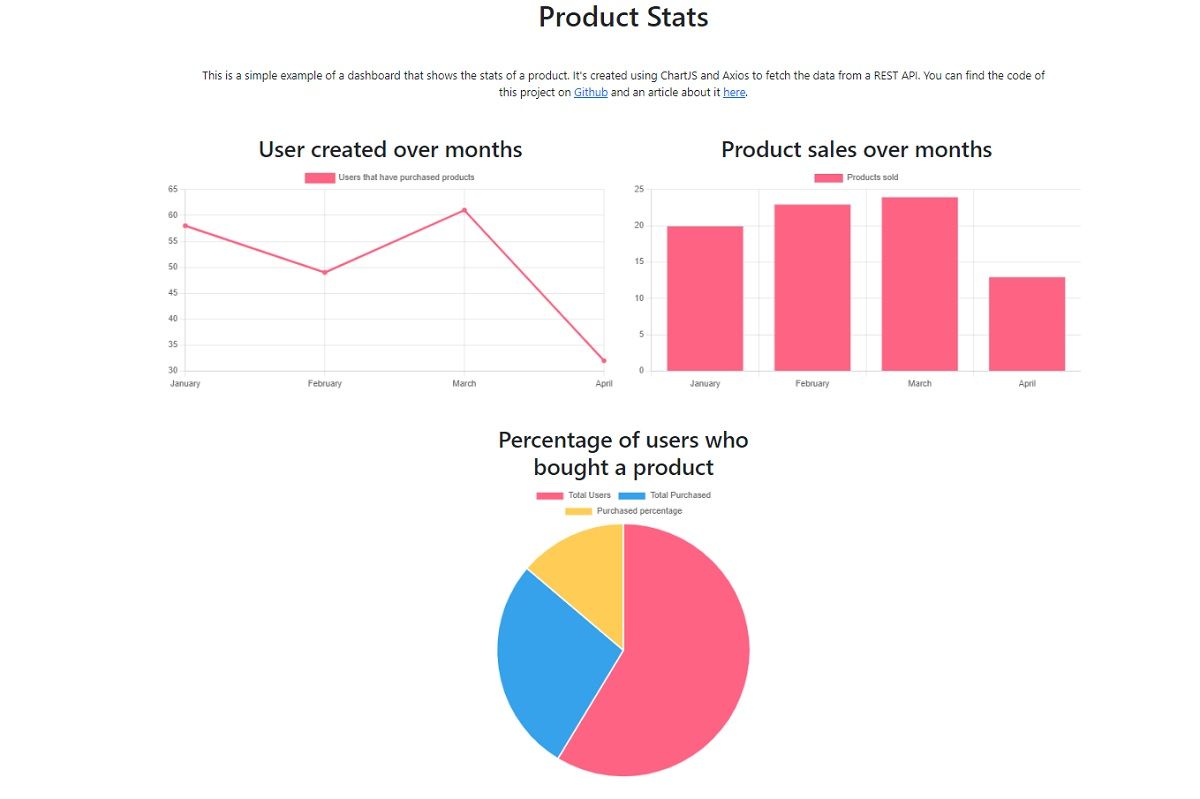
<h1 class="text-center">Product Stats</h1>
<div class="row">
<!-- LINE Chart -->
<div class="col-6 mr-2">
<h2 class="text-center">
User created over months
</h2>
<canvas id="user-created"></canvas>
</div>
<!-- Bar Chart -->
<div class="col-6 ml-2">
<h2 class="text-center">
Product sales over months
</h2>
<canvas id="product-sales"></canvas>
</div>
<!-- PIE Chart -->
<div class="col-4 mx-auto">
<h2 class="text-center">
Percentage of users who bought a product
</h2>
<canvas id="user-purchased"></canvas>
</div>
</div>
Once we have a minimum HTML file, we need to code the JS code that consumes the API and injects the data into the charts:
👉 Index.JS - Charts and API glueAt the root of the project, create a directory called static. Inside this directory create another directory called js. This directory will contain the static JavaScript files. And finally, create a index.js file in the newly-created directory.
Let’s write the steps needed for fetching and configuring charts.
- Adding a function to fetch data and return a response
- Retrieve data from each endpoint
- Initialize the data with labels
- Initialize the chart configuration
- And finally, create a chart in the DOM.
Let's break down each step and visualize the necessary code to properly render our beautiful charts.
1# - Adding a function to fetch data and return a response
async function getData(url) {
   const res = await axios.get(url);

   return await res.data;
2# - Retrieve data from each endpoint
let userPurchased = {};
let productSales = [];
let userCreated = [];

// Fetching data for users that have purchased products

userPurchased = getData('/api/user/stats/purchased');

// Fetching data for users created over month

userCreated = getData('/api/user/stats/users_created');

// Fetching data for products sold over month

productSales = getData('/api/product/sales');
3# - Inject the data into Charts
Let’s initialize the data with labels, initialize the chart configuration and finally create a chart in the DOM for the userCreate for example.
userCreated.then((response) => {
   const dataUserCreated = {
       labels: response.map((data) => data.month),
       datasets: [{
           label: 'Users that have purchased products',
           backgroundColor: 'rgb(255, 99, 132)',
           borderColor: 'rgb(255, 99, 132)',
           data: response.map((data) => data.count),
       }]
   };

   const configUserCreated = {
       type: 'line',
       data: dataUserCreated,
       options: {}
   };

   // Creating new chart

   new Chart(
       document.getElementById('user-created'),
       configUserCreated
   );
})
And let’s do the same for userPurchased and the productSales.
productSales.then((response) => {
   const dataProductSales = {
       labels: response.map((data) => data.month),
       datasets: [{
           label: 'Products sold',
           data: response.map((data) => data.count),
           borderWidth: 1,
           backgroundColor: 'rgb(255, 99, 132)',
       }]
   };

   const configProductSales = {
       type: 'bar',
       data: dataProductSales,
       options: {
           scales: {
               y: {
                   beginAtZero: true
               }
           }
       },
   };

   new Chart(
       document.getElementById('product-sales'),
       configProductSales
   );
});
userPurchased.then((response) => {
   const dataUserPurchased = {
       labels: [
           'Total Users',
           'Total Purchased',
           'Purchased percentage'
       ],
       datasets: [{
           label: 'Users created',
           data: Object.values(response),
           backgroundColor: [
               'rgb(255, 99, 132)',
               'rgb(54, 162, 235)',
               'rgb(255, 205, 86)'
           ],
           hoverOffset: 4
       }]
   };


   const configUserPurchased = {
       type: 'pie',
       data: dataUserPurchased,
   };


   new Chart(
       document.getElementById('user-purchased'),
       configUserPurchased
   );
});
Once the JS part is fully coded, the last step is to update the product routing and start using the project.
In the apps directory, create a views.py file, and add the following content.
from django.template import loader
from django.shortcuts import render
def index(request):
   context = {"segment": "index"}

   return render(request, "index.html", context)
And add the urls.py to the apps directory with the following content.
from django.urls import path

from . import views

urlpatterns = [
   # The home page
   path("", views.index, name="home"),
]
And register the apps/urls.py in the project urls.py file.
..
urlpatterns = [
   path('admin/', admin.site.urls),
   path('', include('apps.urls')),
   path("api/", include(("apps.routers", "api"), namespace="api")),
]
..
Make sure the server is running then and visit the app in the browser. At this point, we should see the three charts beautifully rendered on the home page.
✨ Conclusion
In this article, we’ve learned to build an API that serves statistics using Django and Django REST Framework (DRF). We’ve also created an HTML template to display data served by the REST API using Chart.js and Axios.
Thanks for reading!