How to Integrate Django with React (With Sample)
Learn how to integrate Django with React and use the full power from both frameworks - Free sample included.


Creating full-stack applications using React and Django, where data can be passed across both frameworks can prove to be a challenge, let alone an application where those data are to be used in visualizations. In this tutorial, we will be exploring how to pass data between Django and React without an API, using the data to plot a chart using recharts a javascript library.
The starter coded during this demonstration can be found on GitHub and also a LIVE demo is available for reference. Thanks for reading!
- 👉 React & Django Integration - Source Code
- 👉 React & Django Integration - LIVE Demo

React KickOff
React is a JavaScript library that was developed by Facebook. It is mainly used for building single-page applications and is highly popular among developers. React allows developers to create reusable components that can be easily combined to create complex UIs.
The library is built around the concept of the virtual DOM, which is a lightweight representation of the actual DOM that allows React to update the UI when state or props change efficiently. React uses a syntax called JSX, which allows developers to write HTML-like code that gets compiled to JavaScript, to build components. This syntax makes it easy to create complex UIs in a declarative and readable way.
What is Django
Django is a high-level Python web framework that was created to help developers build web applications quickly and efficiently. It follows the Model-View-Controller (MVC, MVT) architectural pattern and comes with many built-in features and tools that make it easy to develop scalable and secure web applications.

Django’s key features include an object-relational mapper (ORM), which allows you to interact with your database using Python code, built-in user authentication and authorization, and automatic admin interface generation. It also provides a Request-Response framework that helps you handle HTTP requests and responses. Django is highly customizable and modular, allowing developers to add third-party libraries and plugins to extend its functionality.
Why React and Django
Although Django combined with VanillaJs can be used to create full-stack applications when Django is being used with React, they offer the best of both worlds.
- Proper management of code from both the backend and front end.
- A high level of customization can be achieved by combining Reactjs with Django.
- Minimal code for both frontend and backend, as Django already comes with a lot of features built-in and Reactjs allows you to create reusable components.
Other than the time for setting up the development environment there is little to no setback in using React and Django for building full-stack applications.
Setting Up the Environment
The development environment for this application will be done in stages, first, the React application will be set up and then the Django application will be done next.
👉 Setting up React
Before setting the application, you should have Python and Nodejs installed on your machine, if you don’t head to the Python website and Node to get them installed for your machine. Once you have them installed, follow the steps below to get your environment set up.
✅ (React) Create the directories
From your terminal, navigate into the directory you intend to create your application and run the following commands.
$ mkdir django-react-starter
$ cd django-react-starter
$ npm init -y
✅ (React) Install the javascript packages
$ npm install react react-dom react-router-dom recharts
$ npm install --save-dev @babel/core @babel/preset-env @babel/preset-react babel-loader clean-webpack-plugin css-loaedr style-loader webpack webpack-bundle-tracker webpack-cli
Or simply copy the package.json from the Django React sample:
{
  "name": "django-react-starter",
  "version": "1.0.1",
  "description": "Starter repo for serving a React SPA from Django",
  "main": "index.js",
  "scripts": {
    "dev": "webpack --config webpack.config.js --watch --mode development",
    "build": "webpack --config webpack.config.js --mode production"
  },
  "keywords": [],
  "author": "",
  "license": "ISC",
  "dependencies": {
    "prop-types": "^15.8.1",
    "react": "^18.2.0",
    "react-dom": "^18.2.0",
    "react-router-dom": "^6.10.0",
    "reactflow": "^11.7.0",
    "recharts": "^2.5.0"
  },
  "devDependencies": {
    "@babel/core": "^7.20.12",
    "@babel/preset-env": "^7.20.2",
    "@babel/preset-react": "^7.18.6",
    "babel-loader": "^9.1.2",
    "clean-webpack-plugin": "^4.0.0",
    "css-loader": "^6.7.3",
    "style-loader": "^3.3.1",
    "webpack": "^5.75.0",
    "webpack-bundle-tracker": "^1.8.0",
    "webpack-cli": "^5.0.1"
  }
}
✅ (React) Install modules via Yarn or NPM
$ yarn
// OR
$ npm i
✅ (React) Code the React App entrypoint in frontend/src/index.js
import React from "react";
import ReactDOM from "react-dom/client";

export default function App() {
  return (
    <div>
      <h1>This is a react Application</h1>
    </div>
  );
}

const root = ReactDOM.createRoot(document.getElementById("app"));
root.render(<App />);
When the frontend and backend integration is completed, the component created by the App function will be rendered on the webpage.
👉 Coding Django Backend
From the terminal run the following commands from the django-react-starter folder.
✅ (Django) Create the virtual environment (for packages installation)
First, we will be creating a virtual environment to isolate our application from packages installed globally. To create a virtual environment run the following command:
$ virtualenv venv
$ source venv/bin/activate
Once the virtual environments have been created and activated we will be installing all the packages that will be used for the development of our application.
✅ (Django) The command below installs the packages:
$ pip install django django-webpack-loader # Used for Dj & React Integration
$ pip install django-admin-datta           # Used for styling
$ django-admin startproject core .         # Create Django Core Project
$ python manage.py migrate                 # Set up the DB
The above commands create a minimal Django project and set up the database. Running the command python manage.py runserver will start the Django application.
Integrating React and Django
The packages that have been installed using NPM and PIP would interact together through webpack and django-webpack-loader, a Javascript builder tool, and a Python library respectively.
This toolchain creates the interface for both codebases to be used as one, making it possible to write react components that will be rendered on Django routes. Webpack creates a javascript file from the react components, Django recognizes the file as a static file and the file is added script tag on the pages.
We will see all this play out as we move further in the tutorial.
✅ (Django & React) Create a file webpack.config.jsThis file configures Webpack where are the frontend files (entry point, assets, ..etc) in order to have a successful build.
// Contents of webpack.config.js (truncated content)
. . .
module.exports = {
  entry: {
    frontend: "./frontend/src/index.js",
  },
  output: {
    path: path.resolve("./frontend/static/frontend/"),
    filename: "[name]-[fullhash].js",
    publicPath: "static/frontend/",
  },
. . .
The entry directive specifies various static resources that are to be compiled using webpack, the configuration contains only one entry and it is named frontend. output defines the name and location of the complied static files. BundleTracker generates a file that helps django-webpack-loader find and work with the compiled files.
With this, the React configuration is done and we can move forward to the Django part.
✅ (Django & React) - Update the configuration for Django
Open core/settings.py and make the following changes to the files, do not forget to import the os module at the top of the file.
# core/settings.py (truncated content)
. . .
INSTALLED_APPS = [
    'webpack_loader',
    'frontend',
    'admin_datta.apps.AdminDattaConfig',
    'django.contrib.admin',
    'django.contrib.auth',
    'django.contrib.contenttypes',
    'django.contrib.sessions',
    'django.contrib.messages',
    'django.contrib.staticfiles',
    'apps',
]

WEBPACK_LOADER = {
    "DEFAULT": {
        "BUNDLE_DIR_NAME": "frontend/",
        "STATS_FILE": os.path.join(BASE_DIR, "webpack-stats.json"),
    }
}
. . .
With this configuration updated, the frontend folder is recognized as a Django application with full access. The configuration also registers webpack_loader and admin_datta for dashboard styling.
✅ (Django) - Code a minimum routing and serve pages
Open core/urls.py and add the following lines to register the routes:
# core/urls.py
...
from django.urls import path, include

urlpatterns = [
    path("", include('apps.urls')),
    path("admin/", admin.site.urls),
    path("", include("admin_datta.urls")),
]
With this, the index route now points to the Django app created earlier.
The next step is to create a controller to handle the requests sent to the index route.
# apps/views.py
...
def index(request):
    return render(request, "index.html")
The content of this file is linked to the "APP" element used by React to inject the code:
{% comment %}templates/index.html{% endcomment %}
{% extends 'layouts/base.html' %}
{% load static %}

{% load render_bundle from webpack_loader %}

{% block breadcrumbs %}{% endblock breadcrumbs %}

{% block content %}
    <div id="app"></div> <!-- This element  is used by React -->
{% endblock %}
At this point, Django and React are bundled together, but the communication is not there yet. Here are the steps to start the project:
In one terminal, we need to compile and start the React side for development (with LIVE reload) using:
$ yarn ; yarn devIn another terminal, Django needs to be started using the runserver directive:
$ python manage runserverIf the index page is not showing any errors, we can say that the configuration is done correctly and we can move forward.
Adding ReCharts
Having this minimal codebase up & running, we can focus on the React part to render a simple PIE chart using ReCharts.
The first step is to create Charts.js file inside the frontend/src directory. This code, once compiled by Webpack, will be rendered in our simple Django template.
import React from "react";
import { PieChart, Pie, ResponsiveContainer, Cell } from "recharts";

const data = [
  {
    name: "Group A",
    count: 10,
  },
  {
    name: "Group B",
    count: 20,
  },
  {
    name: "Group C",
    count: 50,
  },
];

export default function Chart() {
  return (
      <PieChart width={400} height={250}>
        <Pie
          data={data}
          dataKey="count"
          cx="50%"
          cy="50%"
        ></Pie>
      </PieChart>
  );
}
The code above uses recharts to create a pie chart using the objects inside the data array. The PieChart component accepts several props and child components. You can check recharts documentation here to see all the options available.
Inside PIE component, the data prop should be assigned to an array of objects, datakey is the key of the value intended to be shown on the pie chart.
At this point, the React component should be visible on the page but renders hardcoded data.
Using data from Django
So far, this tutorial has covered making static PIE charts, next, we will explore how to create dynamic pie charts using data from a Django model.
👉 Create a Django Model
Inside the models.py file add the following code snippet.
class Sales(models.Model):
id = models.AutoField(primary_key=True)
product = models.CharField(max_length=100, default='Nike')
price = models.IntegerField(default=99)
fee = models.IntegerField(default=5)
currency = models.CharField(max_length=3, default='usd')
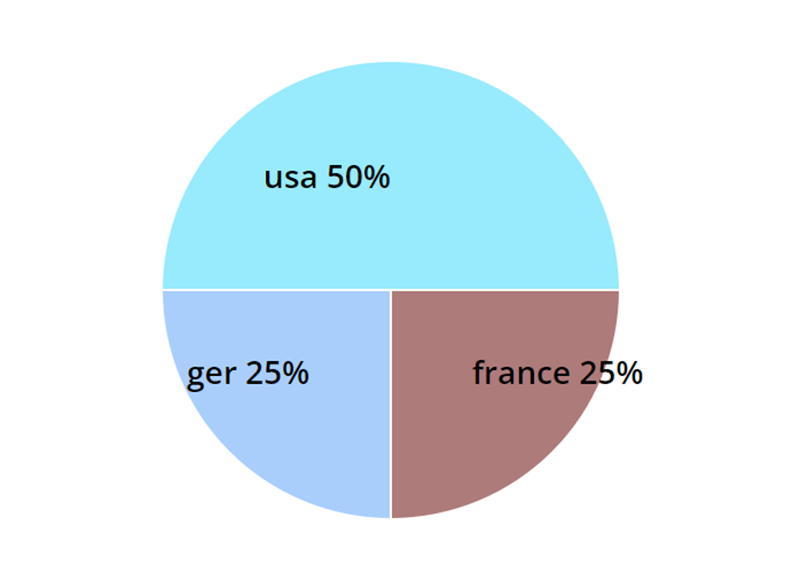
country = models.CharField(max_length=100, default='usa') With the definition of Sales model in place, we need to migrate and add some simple data using the Django CLI.
$ python manage.py makemigrations
$ python manage.py migrate
$ // Start the CLI
$ python manage.py shell
>>> from apps.home.models import Sales
>>> s1 = Sales()
>>> s1.save()
>>>
>>> s2 = Sales()
>>> s2.country = 'ger' # Create a sale from `Germany`
>>> s2.save()
>>>
>>> s4 = Sales()
>>> s4.country = 'france' # And another one from France
>>> s4.save()
👉 Making the Chart Dynamic
The database information will be provided by a new controller that pulls all the records from the Sales model and exports the data into the template to be used by React.
# apps/home/views.py (trucncated content)
. . .
from collections import Counter
from .models import Sales
. . .

def chart(request):
    countries = list(Sales.objects.values_list('country', flat=True))
    country_counts = Counter(countries)
    country_count = [
        {'country': country, 'count': country_counts[country]}
        for country in country_counts]
    return render(request, "recharts.html", {"country_count": country_count})
All the countries from the database using the Counter object, and a new List of dictionaries was created, with the dictionary containing the name of the country and how many sales are present for that country.
The data obtained from the database has already been sent as a context to the Django Template, next step is parsing that data and making it accessible by React.
✅ (Django) Update the file templates/recharts.html with the following code:
{% block content %}
    <div id="app"></div>
    {{ country_count|json_script:'country_count' }}
    {% render_bundle 'frontend' %}
{% endblock %}
{{ country_count|json_script:'country_count_data' }} creates a script tag with the id country_count_data using the data from the country_count context.
Now that the data from the backend is accessible by React, we can use that data for plotting the pie chart.
✅ (React) Update the frontend/src/recharts.js file.
// frontend/src/recharts.js
export default function Chart() {

	// HERE the information is LOADED
    const data = JSON.parse(document.getElementById('country_count_data').textContent);

}
The above code snippet, executed in the context of React, loads the backend data from the "country_count_data" element, injected as JSON.
A few lines below, the information saved in the variable "data" is used to showcase the PIE Chart:
<PieChart width={400} height={250}>
	<Pie data={data} >
		{data.map((entry, index) => (
			<Cell key={`cell-${index}`} fill={colors[index]} />
		))}
	</Pie>
</PieChart>
In the end, the chart should look as below:
Conclusion
Building a full-stack application using Django and React is a great way for developers to leverage the benefits of two powerful technologies to create an efficient, scalable, and responsive web application. Django provides a robust, scalable, and secure back-end framework with built-in database models, APIs, and an admin interface, while ReactJS offers a modern, high-performance, and flexible front-end library for building dynamic UIs.
In addition to the benefits mentioned above, using Django and ReactJS enables developers to leverage the wider ecosystem of tools and libraries available in the Python and JavaScript ecosystems, such as Django REST Framework, Redux, ..etc.
In summary, a Django and ReactJS full-stack application is a powerful and versatile solution that enables developers to build effective, modern, and scalable web applications in a fast and efficient way.
Thanks for reading! For more resources and support, feel free to access:
- 🚀 Free Support via Email and Discord (just in case)
- 👉 React Apps and dashboards (free & paid) crafted by AppSeed